

There’s something truly magical about the moment when rich chocolate and smooth mousse come together in a single dessert. Chocolate Mousse Brownies have been a go-to treat in my kitchen for years, especially when I want to impress guests or simply indulge in something luxurious. The first time I baked this dessert, I was aiming for something that combined the chewiness of a brownie with the airy lightness of mousse. What came out of the oven that day became an instant favorite—and I’ve been making it ever since.
You’re going to love this recipe because it brings together the best of both dessert worlds: the dense, fudgy base of a classic brownie and a light, velvety mousse topping that melts in your mouth. It’s the perfect balance between rich and airy. Whether you’re baking for a special celebration, a weekend family gathering, or just a quiet moment with a cup of coffee, these brownies elevate the occasion.
What makes this recipe even more lovable is its versatility. You can dress it up with a drizzle of chocolate ganache or keep it simple with a dusting of cocoa powder. Want to add a little crunch? Sprinkle chopped nuts between the layers. You can even swap in your preferred type of chocolate—dark, semi-sweet, or milk chocolate—all work wonderfully. If you’re trying to keep it a bit lighter, you can use low-fat cream in the mousse or opt for a gluten-free brownie base.
Not only is this dessert indulgent and adaptable, but it’s also surprisingly affordable to make. Most of the ingredients are pantry staples—cocoa powder, flour, sugar, eggs, and chocolate. The mousse calls for cream and chocolate, both of which are easily accessible and cost-friendly. Even if you’re on a budget, this recipe offers a rich taste without requiring expensive ingredients or fancy equipment.
Here are the main ingredients you’ll need to create this masterpiece:
For the Brownie Layer:
-
All-purpose flour
-
Unsweetened cocoa powder
-
Granulated sugar
-
Eggs
-
Melted butter
-
Vanilla extract
-
Baking powder
-
A pinch of salt
For the Chocolate Mousse:
-
Semi-sweet or dark chocolate (melted)
-
Heavy whipping cream
-
Powdered sugar
-
Vanilla extract
How to Prepare Chocolate Mousse Brownies – Creamy Layers With Decadent Flavor
Creating Chocolate Mousse Brownies is easier than it looks. While it may appear like a complex, layered dessert, the process is surprisingly quick and straightforward. You don’t need any fancy kitchen skills—just a little patience and the desire to create something absolutely indulgent. Let’s break it down step by step.
Step-by-Step Instructions for Preparation
Step 1: Prepare the Brownie Layer
-
Preheat the Oven
Start by preheating your oven to 175°C (350°F). Grease a square 9×9 inch baking pan and line it with parchment paper. This ensures your brownies won’t stick and are easy to lift out after baking. -
Mix the Dry Ingredients
In a medium bowl, whisk together 3/4 cup of all-purpose flour, 1/2 cup of unsweetened cocoa powder, 1/4 teaspoon of baking powder, and a pinch of salt. Set aside. -
Blend the Wet Ingredients
In a separate large bowl, beat 2 large eggs with 1 cup of granulated sugar until the mixture becomes pale and fluffy. Stir in 1/2 cup of melted butter and 1 teaspoon of vanilla extract. -
Combine
Gradually add the dry ingredients to the wet ingredients. Mix until just combined—don’t overmix. The batter will be thick and rich. -
Bake
Pour the batter into the prepared baking pan and smooth out the top. Bake for 20–22 minutes, or until a toothpick inserted in the center comes out with a few moist crumbs. Do not overbake. Let the brownies cool completely in the pan.
Step 2: Make the Chocolate Mousse
-
Melt the Chocolate
In a heatproof bowl, melt 1 1/2 cups of chopped semi-sweet or dark chocolate using a double boiler or microwave in 30-second bursts, stirring between each. Set aside to cool slightly. -
Whip the Cream
In a separate bowl, whip 1 1/2 cups of cold heavy cream with 2 tablespoons of powdered sugar and 1 teaspoon of vanilla extract. Beat until soft peaks form. Soft peaks mean the cream holds its shape but the tip falls slightly. -
Fold the Mousse Together
Gently fold one-third of the whipped cream into the cooled melted chocolate. Once it’s fully combined, fold in the rest. Take your time here—gentle folding creates that light and airy mousse texture.
Step 3: Assemble and Chill
-
Layer the Mousse
Once the brownie base is completely cool, spread the mousse evenly over the top. Use a spatula to smooth it out into a clean, flat layer. -
Chill the Dessert
Cover the pan and refrigerate for at least 2 hours, or until the mousse layer is firm. Overnight chilling is even better if you want a perfectly set topping. -
Serve and Enjoy
When ready to serve, lift the dessert from the pan using the parchment paper edges. Slice into neat squares using a sharp, clean knife. Wipe the blade between cuts for clean edges.
Quick and Easy
This recipe is broken down into simple parts, and each stage comes together quickly. The brownie base takes less than 10 minutes to prep, and the mousse is ready in about 15. Most of the time is spent waiting while the dessert chills—so it’s low-effort with high reward. It’s perfect for busy schedules, last-minute gatherings, or a quiet weekend bake.
Customizable
One of the best parts of this dessert is how easily you can make it your own. You can add chopped nuts, a layer of raspberry jam between the brownie and mousse, or a sprinkle of sea salt on top. If you’re serving children or want a lighter flavor, try milk chocolate in the mousse. For a bolder taste, go for extra dark chocolate.
You can even use flavored extracts—like peppermint or almond—in place of vanilla for a unique twist. Want it extra decadent? Top the mousse with a layer of chocolate ganache before chilling.
Popular with Many People
These brownies are a hit wherever I take them. Guests often think they’re from a high-end bakery. The contrasting textures and layers of flavor appeal to both chocolate lovers and those who prefer lighter desserts. It’s a crowd-pleaser at birthday parties, holiday dinners, bake sales, or even casual gatherings.
Because they slice so cleanly and hold their shape well, they also work beautifully for plated desserts or dessert bars at events. They’re elegant enough for celebrations, yet comforting and nostalgic like a classic brownie.
Print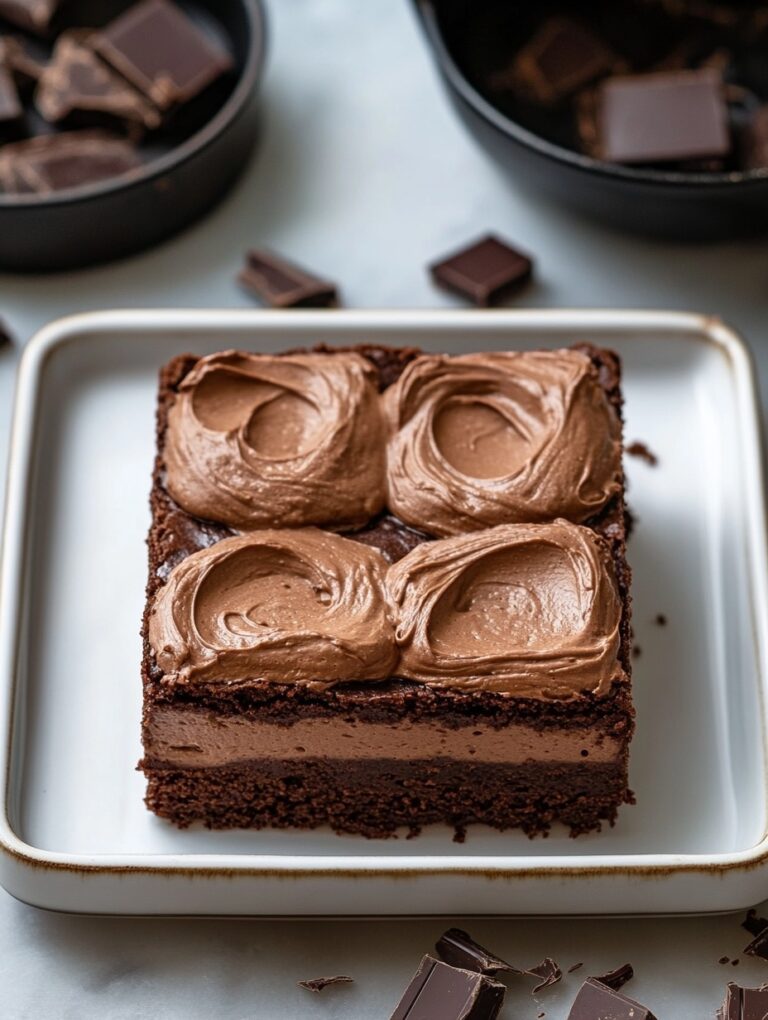
Chocolate Mousse Brownies: Creamy Layers With Decadent Flavor
These Chocolate Mousse Brownies combine two irresistible layers: a rich, fudgy brownie base and a silky, airy chocolate mousse topping. The texture contrast makes each bite satisfying and indulgent. Ideal for special occasions or casual cravings, this recipe delivers elegance with minimal effort.
- Total Time: 47 minutes
- Yield: 12 1x
Ingredients
For the Brownie Layer:
- 3/4 cup all-purpose flour
- 1/2 cup unsweetened cocoa powder
- 1 cup granulated sugar
- 2 large eggs
- 1/2 cup melted butter
- 1 tsp vanilla extract
- 1/4 tsp baking powder
- 1/4 tsp salt
For the Chocolate Mousse:
- 1 1/2 cups semi-sweet or dark chocolate (chopped)
- 1 1/2 cups heavy whipping cream (cold)
- 2 tbsp powdered sugar
- 1 tsp vanilla extract
Instructions
- 1. Prepare the Brownie Layer:
Preheat oven to 175°C (350°F). Grease and line a 9×9 inch pan with parchment paper.
In a medium bowl, whisk together flour, cocoa powder, baking powder, and salt.
In another bowl, beat eggs and sugar until pale and fluffy.
Add melted butter and vanilla to the egg mixture and stir.
Fold in the dry ingredients until just combined.
Spread batter evenly in the pan and bake for 20–22 minutes.
Let brownies cool completely in the pan. - 2. Prepare the Chocolate Mousse:
Melt the chopped chocolate using a double boiler or microwave in short bursts. Let it cool slightly.
In a separate bowl, whip cold cream with powdered sugar and vanilla until soft peaks form.
Fold one-third of the whipped cream into the melted chocolate.
Gently fold in the remaining whipped cream until smooth and airy. - 3. Assemble and Chill:
Once the brownies are cool, spread the mousse over the top evenly.
Cover and refrigerate for at least 2 hours or overnight.
Cut into clean squares using a sharp knife. Wipe the knife between slices for best results.
Notes
Let the brownie layer cool fully before topping with mousse.
Use high-quality chocolate for the richest flavor.
For cleaner slicing, chill the dessert thoroughly before serving.
Add optional toppings like chocolate shavings or chopped nuts if desired.
- Prep Time: 25
- Cook Time: 22
FAQs – Chocolate Mousse Brownies
Can I make these brownies ahead of time?
Yes, absolutely. In fact, making them a day ahead allows the mousse to set perfectly and the flavors to deepen. Simply store the brownies in the refrigerator, covered, until ready to serve.
Do I have to use heavy cream for the mousse?
Heavy whipping cream is ideal because it provides the best texture for the mousse. If you need a lighter version, you can use a light whipping cream, but avoid substitutes like milk or half-and-half—they won’t hold the structure needed.
Can I freeze chocolate mousse brownies?
Yes, you can freeze them. After assembling and chilling the brownies until firm, cut them into squares and wrap each one individually in plastic wrap. Place them in an airtight container and freeze for up to one month. Thaw in the fridge before serving.
What type of chocolate works best?
Semi-sweet or dark chocolate is recommended for a balanced, rich flavor. Milk chocolate can be used for a sweeter version, but it will result in a softer mousse.
How do I get clean cuts when slicing?
Use a sharp knife and wipe it clean between each cut. For extra precision, chill the brownies well before slicing.