

I still remember the first time I served this Cloud Cake—it was a quiet Sunday afternoon, and I had a few friends coming over for coffee. I wanted to prepare something light, dreamy, and not too sweet. That’s how this Heavenly Light Cloud Cake was born. The name came from one of my friends who took a bite and said, “It’s like eating a cloud!” It’s become a go-to favorite in my kitchen whenever I need something elegant yet effortless. Over time, I’ve perfected the texture to achieve the fluffiest bite you can imagine.
This cake is not just about how it looks—it’s about how it makes you feel. Soft, airy, and gently sweet, with a texture so light it practically melts in your mouth. Every bite is a whisper of vanilla and cream, delivering comfort with a touch of sophistication.
Why You Will Love This Recipe
You’ll fall in love with this recipe for many reasons. First, it’s incredibly simple to make. The ingredients are straightforward, and the technique is beginner-friendly. Yet, the final result looks and tastes like something you’d find in a high-end bakery.
The cake is versatile enough for casual gatherings, birthday parties, or even elegant afternoon teas. It’s one of those desserts that surprises people—not too heavy, not too sweet, just perfectly balanced.
You’ll also appreciate how this recipe doesn’t overwhelm with sugar. It has just the right amount to bring out the delicate flavors while keeping it light and fresh.
Versatile
What makes this cake so special is how easy it is to personalize. You can top it with seasonal fruits like strawberries, raspberries, or peaches. For a chocolatey twist, drizzle with melted white or dark chocolate. You can even flavor the sponge base with citrus zest, almond extract, or rose water. Each variation creates a unique version that remains true to the cloud-like essence of the original.
It’s also perfect as a base for layered desserts. Want to turn it into a trifle? Just cube it and layer with whipped cream and berries. Want a birthday cake? Add a soft buttercream or whipped frosting between layers.
Affordable
Another wonderful thing about the Heavenly Light Cloud Cake is how budget-friendly it is. The ingredients are likely already in your pantry: eggs, flour, sugar, and a bit of milk. There’s no need for special tools or expensive components. And yet, the finished product looks and tastes luxurious. It’s a cake that proves you don’t need a fancy list to bake something truly special.
Ingredients for the Recipe
-
6 large eggs, room temperature
-
1 cup granulated sugar
-
¾ cup cake flour (or sifted all-purpose flour)
-
¼ teaspoon salt
-
1 teaspoon vanilla extract
-
¼ cup milk (whole or 2%)
-
1 teaspoon lemon juice (optional, for stability)
-
Powdered sugar, for dusting (optional)
-
Fresh fruits or whipped cream, for topping (optional)
HOW TO PREPARE THIS RECIPE
Creating the Heavenly Light Cloud Cake is a joy from start to finish. This recipe is perfect when you want a no-fuss, crowd-pleasing dessert that feels impressive yet doesn’t require complicated techniques. The key to the cloud-like texture lies in gentle mixing, proper folding, and maintaining air in the batter. Once you understand the steps, you’ll find yourself making this cake again and again for all sorts of occasions.
STEP-BY-STEP INSTRUCTIONS FOR PREPARATION
1. Prepare the oven and pan
Start by preheating your oven to 160°C (320°F). Lightly grease the bottom of a 9-inch round cake pan and line it with parchment paper. Do not grease the sides—this helps the cake rise properly.
2. Separate the eggs carefully
Crack the eggs one at a time, separating the yolks from the whites into two large mixing bowls. Be sure no yolk gets into the whites. This is important for achieving stiff peaks during whipping.
3. Whip the egg whites
Add lemon juice and a pinch of salt to the egg whites. Using a stand mixer or hand mixer, beat the whites on medium speed until foamy. Gradually add half the sugar while continuing to beat. Increase to high speed and beat until stiff, glossy peaks form. This will take about 5–6 minutes. The whipped whites should hold their shape firmly.
4. Whisk the yolks and sugar
In the other bowl, beat the egg yolks and the remaining sugar until pale and thick. This should take around 3–4 minutes. The mixture should be light in color and fall in thick ribbons from the whisk.
5. Add milk and vanilla
Pour in the milk and vanilla extract and whisk until just combined.
6. Sift and fold in the flour
Sift the cake flour directly into the yolk mixture in two additions. Use a rubber spatula to gently fold until incorporated. Avoid overmixing. The batter should be smooth but still airy.
7. Incorporate the egg whites
Now comes the most crucial step. Add a third of the whipped egg whites into the yolk batter and stir gently to lighten the mixture. Then carefully fold in the remaining whites in two batches. Use long, sweeping motions with your spatula to fold. Don’t stir. This helps retain the air, giving the cake its signature lift and lightness.
8. Transfer and smooth
Pour the batter into the prepared cake pan. Smooth the top with a spatula. Tap the pan lightly on the counter to remove large air bubbles.
9. Bake gently and patiently
Place the cake in the preheated oven and bake for 40–45 minutes. Do not open the oven door during baking. The cake is done when the top is lightly golden and springs back when touched. A toothpick inserted in the center should come out clean.
10. Cool upside down
Remove the cake from the oven and immediately invert the pan onto a wire rack. This prevents the cake from collapsing and keeps the texture airy. Let it cool completely before turning out.
11. Decorate and serve
Once cooled, gently run a knife along the sides to release the cake. Turn it out onto a plate. Dust with powdered sugar, top with whipped cream, or arrange fresh fruit as desired. Strawberries, blueberries, or kiwi slices work beautifully.
QUICK AND EASY
This recipe comes together in just over an hour and requires only a few bowls and tools. Despite its elegant appearance, it’s incredibly beginner-friendly and forgiving if you handle the batter gently. You won’t need any specialty ingredients or equipment beyond a mixer, whisk, and spatula.
CUSTOMIZABLE
There are countless ways to adapt this cloud cake to your preferences. Swap the vanilla for almond or citrus extracts. Add a thin layer of lemon curd or chocolate ganache between layers. For a tropical version, top with whipped coconut cream and mango slices. You can even bake it in a rectangular pan and cut into cubes for cloud cake bites.
Want to make it extra indulgent? Layer with mascarpone cream or a flavored custard. This cake plays well with almost any addition, making it one of the most flexible dessert recipes in your collection.
POPULAR WITH MANY PEOPLE
Every time I serve this cake, I receive compliments—and requests for the recipe. Kids love it for its soft texture and gentle sweetness. Adults enjoy its sophistication and lightness after a meal. It’s often the first dessert to disappear at parties because it feels refreshing rather than heavy. Whether it’s a celebration or just a quiet moment with coffee, this cake is a universal crowd-pleaser.
It’s one of those rare recipes that fits seamlessly into any gathering and makes everyone feel a little more special.
Print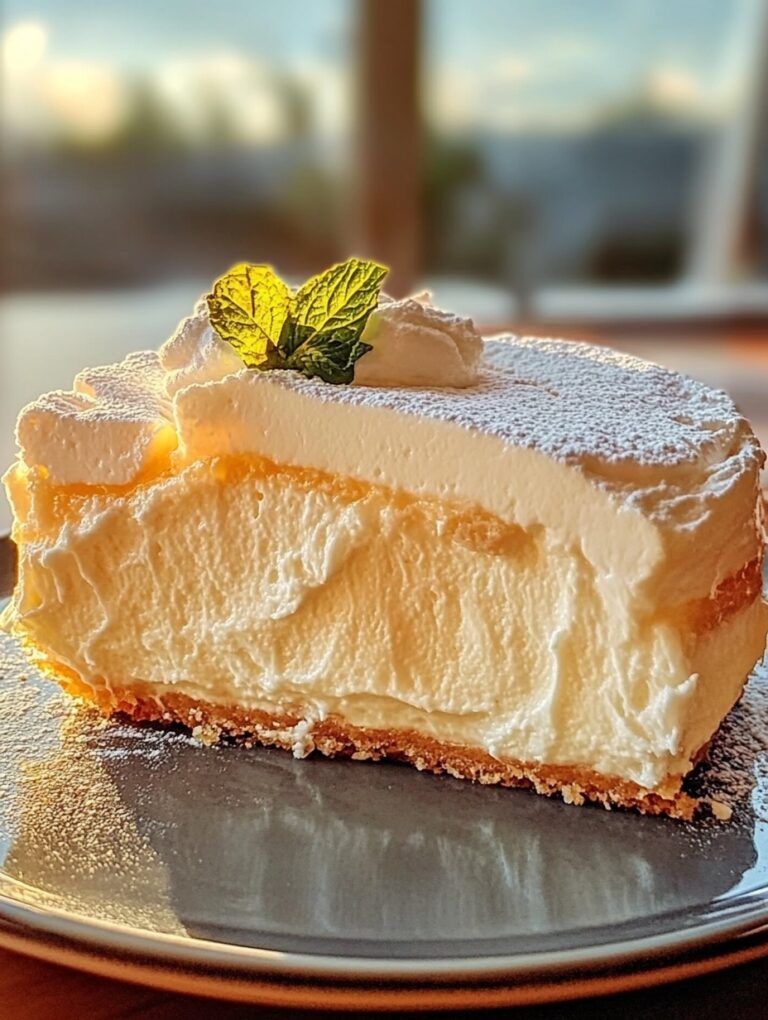
Create Your Own Heavenly Light Cloud Cake
This Heavenly Light Cloud Cake is the perfect balance of simplicity and elegance. With a fluffy, melt-in-your-mouth texture and a subtle vanilla flavor, it’s ideal for everything from celebrations to casual gatherings. It uses basic pantry ingredients, requires no special tools, and delivers consistently beautiful results. Whether served plain or topped with fruit and cream, it always impresses with its airy, cloud-like charm.
- Total Time: 1 hour 5 minutes
- Yield: 8 1x
Ingredients
- 6 large eggs, room temperature
- 1 cup granulated sugar
- ¾ cup cake flour (or sifted all-purpose flour)
- ¼ teaspoon salt
- 1 teaspoon vanilla extract
- ¼ cup milk (whole or 2%)
- 1 teaspoon lemon juice (optional, for egg white stability)
- Powdered sugar, for dusting (optional)
- Fresh fruit or whipped cream, for topping (optional)
Instructions
- Preheat the oven to 160°C (320°F). Grease only the bottom of a 9-inch round cake pan and line it with parchment paper. Leave the sides ungreased.
- Separate the eggs carefully. Place egg whites in one large bowl and yolks in another. Ensure there is no yolk in the whites.
- Whip the egg whites. Add lemon juice and salt to the whites. Beat on medium speed until foamy. Gradually add half the sugar. Increase to high speed and beat until stiff, glossy peaks form.
- Beat the yolks. Add the remaining sugar to the yolks. Beat until thick, pale, and ribbony, about 3–4 minutes. Add milk and vanilla extract. Mix gently.
- Add the flour. Sift the flour into the yolk mixture in two batches. Fold gently with a spatula until just incorporated. Avoid overmixing.
- Incorporate the whites. Add one-third of the whipped whites into the yolk batter and stir to lighten. Gently fold in the remaining whites in two batches, using long, sweeping strokes. Do not deflate the mixture.
- Pour the batter into the pan. Smooth the surface. Tap the pan lightly to remove large air bubbles.
- Bake for 40–45 minutes until golden and springy. Do not open the oven door during baking. Check for doneness using a toothpick.
- Invert to cool. Remove the cake and immediately invert it on a wire rack to cool completely. This prevents it from collapsing and preserves its airy texture.
- Release and decorate. Run a thin knife around the edge to release. Dust with powdered sugar or top with whipped cream and fresh fruits if desired.
Notes
Always use room temperature eggs for better volume.
Avoid overmixing to maintain the airy structure.
Do not grease the sides of the pan to allow the cake to rise properly.
Cooling the cake upside down is essential for structure and height.
- Prep Time: 20
- Cook Time: 45
FAQs
Can I make the Cloud Cake ahead of time?
Yes, you can make this cake a day ahead. Once fully cooled, wrap it tightly in plastic wrap and store it at room temperature. If you’ve added toppings like whipped cream or fruit, store it in the fridge and serve within 24 hours for best texture.
Can I freeze the cake?
Absolutely. This cake freezes well without toppings. Wrap it in two layers of plastic wrap and then in foil. Freeze for up to 2 months. To serve, thaw at room temperature while still wrapped to retain moisture.
Why didn’t my cake rise properly?
This often happens if the egg whites were not whipped to stiff peaks or if they were overmixed when folding into the batter. Be sure to fold gently and not deflate the mixture. Also, avoid opening the oven while baking.
Can I use all-purpose flour instead of cake flour?
Yes, though the texture will be slightly less airy. For a substitute, measure 1 cup of all-purpose flour, remove 2 tablespoons, and replace them with 2 tablespoons of cornstarch. Sift well before using.
Is it okay to skip the lemon juice?
Lemon juice helps stabilize the egg whites, but it’s optional. If you skip it, make sure your mixing bowl and whisk are very clean to get the best volume in your egg whites.
Can I add flavoring or zest to the batter?
Definitely. Vanilla is the base flavor, but you can add lemon or orange zest, almond extract, or even a touch of cinnamon to suit your taste. Just avoid heavy additions that might weigh the batter down.
What pan works best?
A 9-inch round cake pan or a chiffon cake pan works best. Avoid nonstick pans if possible, as they prevent the batter from climbing the sides properly. Use parchment paper only on the bottom of the pan.