
As a baker, I’ve always been inspired by the joy that comes from blending childhood nostalgia with bold, creative twists—and that’s exactly how my Fruity Pebbles Cheesecake Tacos were born. One morning, while preparing a batch of traditional dessert tacos, I glanced at a box of Fruity Pebbles sitting on the shelf and thought, “Why not turn this into something truly magical?” That moment sparked the idea for this vibrant, playful, and flavor-packed dessert that has since become a favorite among my customers, family, and friends.
You’re going to love this recipe because it’s fun, colorful, and packed with flavor. The crunch of Fruity Pebbles cereal paired with the rich creaminess of cheesecake filling creates an irresistible contrast. The shells are slightly crispy and hold together beautifully, while the filling is light, smooth, and just sweet enough. Whether you’re serving these at a kids’ party, weekend brunch, or simply treating yourself after a long day, they are sure to be a hit. They’re festive, photogenic, and truly delightful in every bite.
These cheesecake tacos are also wonderfully versatile. You can top them with whipped cream, fresh berries, chocolate drizzle, or even mini marshmallows to suit your own preferences or match a particular occasion. They’re the kind of dessert that allows room for creativity, making them perfect for customizing to any gathering or theme.
Another great reason to love this recipe? It’s incredibly affordable. With just a few basic ingredients that are easy to find at any grocery store, you can whip up a whole batch without breaking the bank. Fruity Pebbles, cream cheese, whipped topping, powdered sugar, tortillas, butter, and a little cinnamon sugar—that’s all it takes. Most of these are pantry staples, making this recipe an excellent last-minute dessert option.
Here are the key ingredients you’ll need to make Fruity Pebbles Cheesecake Tacos:
-
Soft flour tortillas (small size, preferably street taco size)
-
Unsalted butter (for frying)
-
Cinnamon sugar (for dusting the shells)
-
Fruity Pebbles cereal (for coating and garnish)
-
Cream cheese (softened, for the filling)
-
Powdered sugar (for sweetness)
-
Vanilla extract (for flavor)
-
Whipped topping (folded into the cream cheese for lightness)
These colorful, crispy, creamy tacos have become one of my go-to dessert creations when I want to surprise and delight. Trust me—once you try them, you’ll want to make them again and again.
How to Prepare This Recipe
Making Fruity Pebbles Cheesecake Tacos is just as fun as eating them. This dessert recipe is quick and easy, with simple steps that anyone can follow—even beginners. What makes it so appealing is how easily you can adapt it, whether you want to keep it classic or add your own twist. From the crispy cereal-coated taco shells to the luscious cheesecake filling, every step contributes to the final mouthwatering result.
Step-by-Step Instructions for Preparation:
Step 1: Prepare the taco shells
Start with small soft flour tortillas. These will serve as your taco shells, so their size should be perfect for handheld portions. Use a round cookie cutter if you want to trim them into perfect circles.
Melt some unsalted butter in a skillet over medium heat. Lightly brush each tortilla with melted butter on both sides. Then, fry each tortilla one at a time in the skillet until golden brown and slightly crispy. This usually takes about 30–45 seconds per side.
Step 2: Shape and coat the shells
Right after frying each tortilla, quickly fold it over a rolling pin, or press it between two chopsticks or tongs to form a taco shape while it’s still warm and pliable. Be careful—it’s hot, so work quickly but cautiously.
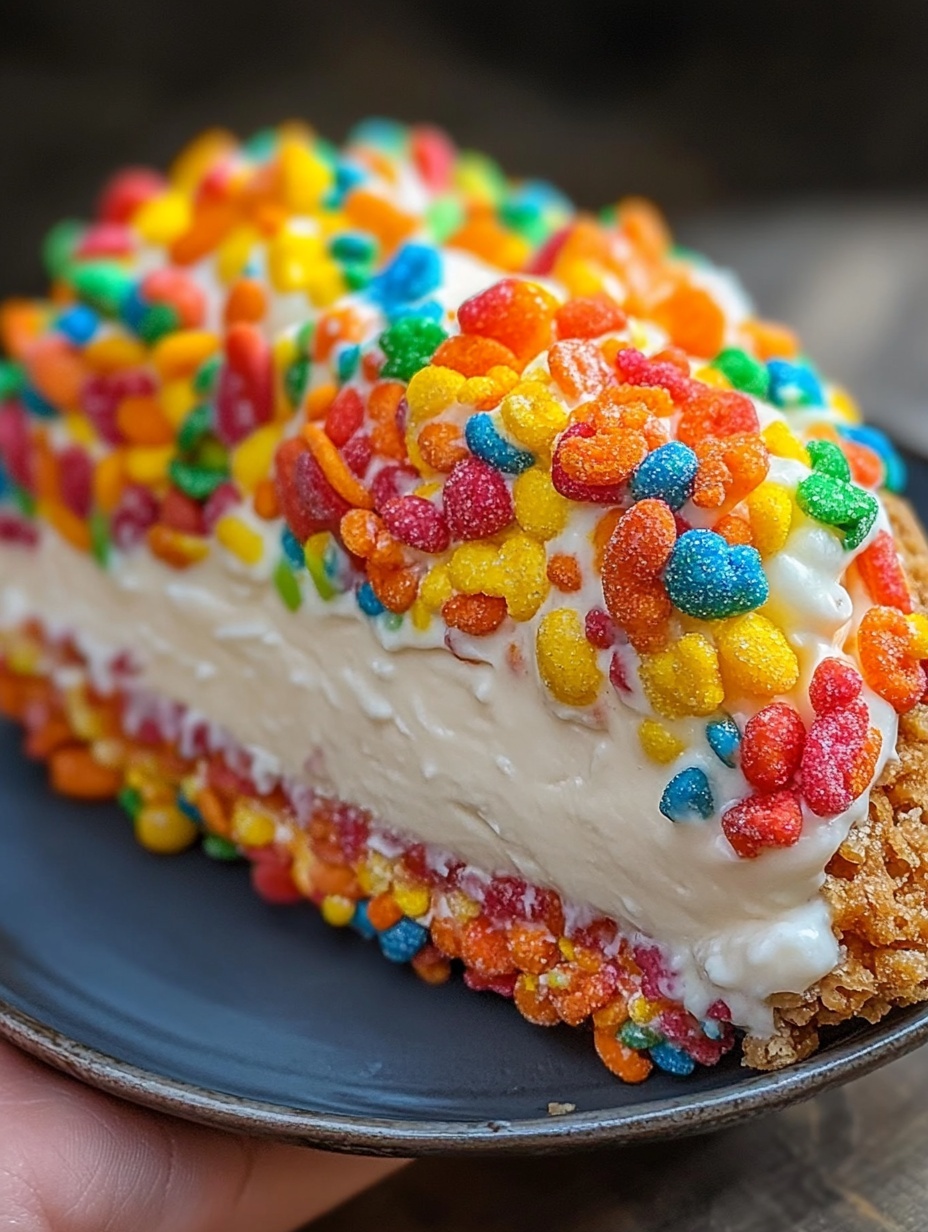
Once shaped, immediately dip each taco shell into a shallow bowl of cinnamon sugar. Make sure both sides are fully coated. Then, press each shell gently into a bowl filled with Fruity Pebbles cereal. The cereal will stick to the surface thanks to the warm butter and sugar. Set the taco shells aside to cool and harden slightly.
Step 3: Make the cheesecake filling
In a large mixing bowl, beat softened cream cheese until smooth. Add in powdered sugar and vanilla extract, then continue beating until fully combined and fluffy. Fold in the whipped topping gently using a spatula until the mixture becomes light and creamy. You want it to be airy, but still stable enough to pipe.
Step 4: Assemble the tacos
Once the taco shells have cooled completely, it’s time to fill them. Transfer the cheesecake filling into a piping bag (or use a plastic zip bag with the corner snipped off). Pipe the cheesecake mixture into the center of each taco shell, filling them generously but not to the point of spilling over.
Step 5: Garnish and serve
Sprinkle extra Fruity Pebbles cereal on top for added crunch and color. You can also add a small swirl of whipped cream, fresh strawberries, or a drizzle of white chocolate sauce if desired. Serve immediately for best texture, or refrigerate for up to 1 hour if making ahead.
Quick and Easy
One of the best parts about this recipe is that it doesn’t require any baking. That means you can make these even on a hot day without turning on the oven. From start to finish, this dessert takes about 30 minutes to prepare. It’s a great option when you need something fast but still want to impress your guests with something colorful and out of the ordinary.
Customizable
This recipe is incredibly flexible. You can substitute Fruity Pebbles with any crispy cereal you like—think Cocoa Pebbles for a chocolate version, or crushed graham crackers for a s’mores twist. You can also flavor the cheesecake filling with lemon zest, orange extract, or even a hint of almond extract depending on your taste.
Want to go dairy-free? You can use dairy-free cream cheese and coconut whipped topping with similar results. Want something extra decadent? Try adding mini chocolate chips or cookie crumbs to the filling. This dessert invites creativity and can evolve with your preferences.
Popular with Many People
These cheesecake tacos are always the star of the table. They appeal to both kids and adults thanks to their fun presentation and balanced flavors. The contrast between the crunchy shell and creamy center makes each bite memorable. They’ve become a frequent request for birthdays, baby showers, school events, and even casual family dinners.
Even people who don’t normally have a sweet tooth enjoy these because they’re light, refreshing, and not overly sugary. They’re colorful, fun to eat, and just unique enough to stand out on any dessert spread.
This is the kind of recipe that gets shared and talked about—and once you serve them, you’ll likely get asked to make them again soon. They’re that good.


Fruity Pebbles Cheesecake Tacos
Fruity Pebbles Cheesecake Tacos are a fun, colorful, and irresistible no-bake dessert that combines crispy cereal-coated taco shells with a smooth, fluffy cheesecake filling. Perfect for parties, birthdays, or a playful treat at home, this recipe is easy to prepare, affordable, and fully customizable.
- Total Time: 30 minutes
- Yield: 6 1x
Ingredients
- 6 small flour tortillas (street taco size)
- 3 tablespoons unsalted butter (melted, for frying)
- ½ cup cinnamon sugar (for coating)
- 1½ cups Fruity Pebbles cereal (plus more for topping)
- 1 package (8 oz) cream cheese, softened
- ⅓ cup powdered sugar
- 1 teaspoon vanilla extract
- 1 cup whipped topping (folded into filling)
Instructions
- Prepare the taco shells:
Brush both sides of each tortilla lightly with melted butter. In a skillet over medium heat, fry each tortilla for 30 to 45 seconds on each side until golden and slightly crisp. - Shape the tacos:
While still hot, fold the tortillas gently over a rolling pin or between chopsticks to form a taco shell. Let them cool slightly while holding the shape. - Coat the shells:
Immediately dip each warm shell into cinnamon sugar, ensuring even coverage. Then press each one gently into Fruity Pebbles cereal so the cereal sticks to the outer surface. Place on a wire rack to cool completely and firm up. - Make the cheesecake filling:
In a large bowl, beat the softened cream cheese until smooth. Add the powdered sugar and vanilla extract. Mix until fully combined. Fold in the whipped topping until the mixture becomes airy and light. - Fill the taco shells:
Transfer the cheesecake mixture to a piping bag or a resealable plastic bag with one corner snipped. Pipe the filling generously into the cooled taco shells. - Garnish and serve:
Sprinkle extra Fruity Pebbles on top of the filling. Serve immediately for best texture or refrigerate for up to 1 hour before serving.
Notes
Make sure taco shells are fully cooled before adding the filling to prevent sogginess.
You can substitute Fruity Pebbles with other cereals like Cocoa Pebbles or crushed cornflakes.
Add a swirl of whipped cream or drizzle of white chocolate for a fancier presentation.
- Prep Time: 20
- Cook Time: 10
FAQs
Can I make these cheesecake tacos ahead of time?
Yes, you can prepare the components in advance. The taco shells can be made and stored in an airtight container for up to 24 hours. The cheesecake filling can also be made ahead and kept refrigerated. However, it’s best to assemble the tacos just before serving to keep the shells crisp.
Can I use a different cereal instead of Fruity Pebbles?
Absolutely. This recipe works with many types of cereal. Cocoa Pebbles, Frosted Flakes, or even crushed cornflakes can be used for a different flavor and texture. You can adapt it to match your guests’ preferences or create themed variations.
Is there a dairy-free option?
Yes. Use a plant-based cream cheese and dairy-free whipped topping. The texture may vary slightly, but it will still yield a creamy and delicious filling suitable for dairy-free diets.
How do I keep the shells from becoming soggy?
Make sure the shells are fully cooled before filling them. Also, avoid overfilling and serve them shortly after assembly. If you need to store them, keep the filling and shells separate until ready to serve.
Can kids help with this recipe?
Yes, especially with dipping the shells in cereal and decorating. Just supervise the frying step for safety.