
A Short Story About the Recipe
I have always loved finding fun ways to reinvent classic desserts, and these No-Bake Oreo Cheesecake Sushi Rolls are one of my most creative kitchen experiments yet. The idea came to me on a quiet afternoon when I was craving cheesecake but didn’t want to turn on the oven. I also wanted something playful that would be a hit with kids and adults alike. That is when I thought, why not roll cheesecake into bite-sized pieces, like sushi? The result was this dessert – creamy, rich, chocolaty, and surprisingly elegant to serve. It quickly became one of my favorite no-bake recipes, perfect for special occasions, parties, or even a casual weekend treat.
The first time I made these, I shared them with my friends, and they were gone within minutes. Everyone loved how fun and unique they looked, and they were amazed that something so fancy could be made without any baking. Now, these Oreo cheesecake rolls are a go-to dessert whenever I want to impress my guests without spending hours in the kitchen.
Why You Will Love This Recipe
You will love this recipe because it combines two beloved desserts – Oreo cookies and cheesecake – into a creative, bite-sized treat. It looks fun on the plate, tastes indulgent, and is incredibly easy to make. You don’t need any special equipment or baking skills to achieve a beautiful result.
Versatile
This dessert is versatile and easy to adapt. You can use different cookie flavors, switch up the filling by adding peanut butter or Nutella, or top with a drizzle of melted chocolate for an elegant finish. It works for birthdays, kids’ parties, date nights, or even as a sweet afternoon snack.
Affordable
All the ingredients for this recipe are budget-friendly and easy to find. Oreos, cream cheese, sugar, and a touch of vanilla are all you need to create a dessert that feels gourmet but won’t break the bank.
Ingredients for the Recipe
-
24 Oreo cookies
-
1/4 cup melted butter
-
8 oz cream cheese, softened
-
1/3 cup powdered sugar
-
1 tsp vanilla extract
How to Prepare This Recipe
Making No-Bake Oreo Cheesecake Sushi Rolls is simple, quick, and fun. You don’t need to worry about preheating an oven or monitoring bake times. Everything comes together in just a few easy steps, and the result is a dessert that looks impressive enough to serve at any gathering.
Step-by-Step Instructions for Preparation
Step 1: Prepare the Oreo Base
Place the Oreo cookies in a food processor and pulse until you get fine crumbs. If you don’t have a food processor, place the cookies in a zip-top bag and crush them with a rolling pin until the texture is uniform and crumbly. Transfer the crumbs to a large bowl. Add the melted butter and mix until all the crumbs are evenly coated and the mixture resembles wet sand.
Step 2: Shape the Base
Line a flat surface with parchment paper. Spread the Oreo mixture onto the paper, pressing it down firmly with a spatula or the back of a spoon to create a smooth, even layer. You should aim for a rectangular shape, about half an inch thick. Place this layer in the refrigerator for 15–20 minutes to firm up before adding the filling.
Step 3: Prepare the Cheesecake Filling
In a medium mixing bowl, combine the softened cream cheese, powdered sugar, and vanilla extract. Beat with a hand mixer or whisk until the mixture is smooth, creamy, and lump-free. The filling should be soft but not runny. If it feels too loose, place it in the refrigerator for about 10 minutes to firm up slightly.
Step 4: Assemble the Rolls
Remove the chilled Oreo base from the refrigerator. Carefully spread the cheesecake filling evenly over the entire surface, leaving about half an inch of space along the edges to prevent overflow when rolling.
Step 5: Roll the Layer
Using the parchment paper as a guide, gently lift one edge of the Oreo layer and roll it over the filling, just like you would roll a sushi mat. Continue rolling tightly but carefully until you have a full log. Wrap the roll in the parchment paper and refrigerate for at least one hour to set.
Step 6: Slice and Serve
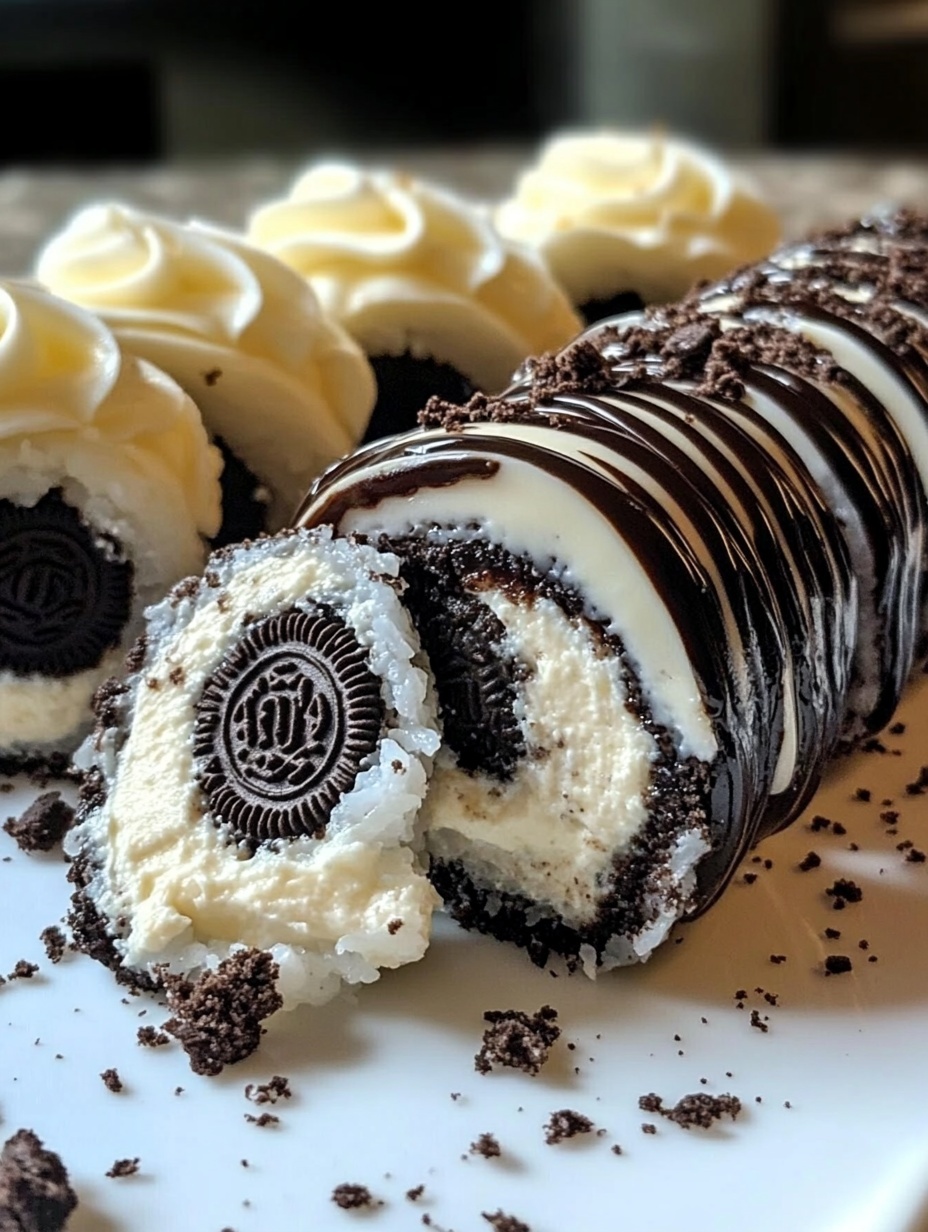
Once firm, remove the roll from the refrigerator and unwrap it carefully. Using a sharp knife, slice the roll into even bite-sized pieces. Wipe the knife clean between cuts to keep the slices neat. Arrange the rolls on a serving plate and enjoy them as they are, or drizzle with melted chocolate for extra decadence.
Quick and Easy
This recipe requires minimal equipment and no baking time, making it ideal for busy days or last-minute dessert needs. The chilling time does most of the work for you, allowing you to prepare other dishes or relax while it sets.
Customizable
You can easily make this recipe your own by experimenting with different flavors. Try using Golden Oreos for a vanilla version, add a swirl of peanut butter to the filling, or sprinkle crushed nuts on top for added texture. You can even make mini versions for parties or add food coloring to the cheesecake filling for themed events.
Popular with Many People
This dessert is always a crowd-pleaser. It’s perfect for kids who enjoy fun and playful food presentations, and adults love its rich cheesecake flavor and creamy texture. Because it’s bite-sized, it’s easy to serve at parties without the need for forks or plates, making it both practical and delicious.
Print
No-Bake Oreo Cheesecake Sushi Rolls
These No-Bake Oreo Cheesecake Sushi Rolls are a fun, bite-sized twist on classic cheesecake. Creamy, chocolaty, and easy to make, they are perfect for parties, special occasions, or a simple indulgent treat. With no baking required, this dessert comes together quickly while still impressing with its elegant presentation.
- Total Time: 25 minutes
- Yield: 16 1x
Ingredients
- 24 Oreo cookies
- 1/4 cup melted butter
- 8 oz cream cheese, softened
- 1/3 cup powdered sugar
- 1 tsp vanilla extract
Instructions
- Prepare the Oreo Base:
Crush the Oreo cookies in a food processor until fine crumbs form. If a processor is not available, crush cookies in a zip-top bag using a rolling pin. Transfer crumbs to a bowl, add melted butter, and mix until the texture is like wet sand. - Shape the Base:
Line a flat surface with parchment paper. Spread the Oreo mixture evenly to form a rectangular layer, about ½ inch thick. Press down firmly and refrigerate for 15–20 minutes to set. - Prepare the Cheesecake Filling:
In a medium bowl, beat the softened cream cheese, powdered sugar, and vanilla extract until smooth and creamy. Chill for 10 minutes if the mixture feels too soft. - Assemble the Rolls:
Spread the cheesecake filling evenly over the chilled Oreo base, leaving a small edge clear for rolling. Carefully lift one side using the parchment paper and roll into a tight log. Wrap in parchment paper and refrigerate for at least one hour. - Slice and Serve:
Remove the roll from the fridge, unwrap, and slice into bite-sized pieces using a sharp knife. Wipe the knife between cuts for clean slices. Arrange on a serving plate and optionally drizzle with melted chocolate.
Notes
Ensure the Oreo base is chilled before adding the filling to prevent cracking.
Use a sharp knife and clean between slices for neat rolls.
Variations: try Golden Oreos, add peanut butter to the filling, or sprinkle crushed nuts on top.
- Prep Time: 25
FAQs
Can I make these rolls ahead of time?
Yes, you can prepare the rolls a day in advance. Keep them wrapped in parchment paper and stored in an airtight container in the refrigerator. They will stay fresh for up to 3 days, making them perfect for parties or meal prep.
Can I use a different type of cookie instead of Oreos?
Absolutely. You can use chocolate sandwich cookies, Golden Oreos, or even homemade cookie crumbs. Just make sure the crumbs are finely crushed and mixed with melted butter for the base to hold properly.
Is it possible to make these rolls vegan or dairy-free?
Yes, you can substitute the cream cheese with a vegan or dairy-free alternative, and use dairy-free cookies and butter. The texture may be slightly different, but the dessert will still be delicious.
How should I slice the rolls without making them crumble?
Use a sharp knife and wipe it clean between cuts to maintain neat slices. Chill the roll thoroughly before slicing, as this helps the cheesecake filling stay firm and prevents crumbling.
Can I freeze the cheesecake sushi rolls?
Yes, you can freeze them. Wrap the slices individually in plastic wrap, then place them in a freezer-safe container. Thaw in the refrigerator for a few hours before serving.
Can I add toppings?
Definitely. You can drizzle chocolate, caramel, or add crushed nuts, sprinkles, or fruit on top for extra flavor and decoration.