

When I first thought about bringing together peanut butter, jelly, and cheesecake, I knew it would be something special. This recipe combines the nostalgic flavors of a childhood sandwich with the creamy richness of a classic cheesecake. Every bite reminds me of that comforting, sweet-and-salty balance that never goes out of style. I love how the peanut butter brings a nutty depth, while the jelly offers fruity freshness that brightens the entire dessert.
You will love this recipe because it is both familiar and surprising. It captures the essence of a peanut butter and jelly sandwich but transforms it into an elegant dessert you can serve at family gatherings, birthdays, or even casual evenings at home. It feels playful yet indulgent, and it always gets people talking. The smooth cheesecake layer blends perfectly with the nutty crust and the glossy swirl of jelly on top. It looks impressive on the table, but it is easy enough to prepare without complicated techniques.
Another reason to enjoy this cheesecake is its versatility. You can choose your favorite jelly flavor to make it personal. Strawberry jelly gives a bright and sweet result, while raspberry adds a touch of tartness. Blueberry brings out a deeper fruitiness, and even mixed berry jelly works beautifully. The peanut butter pairs with all of them, giving you the freedom to customize the flavor for your guests or your own preference. You can also play with the crust by using graham crackers, digestive biscuits, or even crushed chocolate cookies.
This recipe is also very affordable. The ingredients are simple pantry staples: cream cheese, peanut butter, sugar, eggs, and jelly. Most of these are items you likely already have at home. Even if you need to buy them, the cost is much lower than ordering a cheesecake from a bakery. You can prepare a beautiful homemade dessert without breaking your budget, and the flavor will be so much fresher than anything store-bought.
Ingredients for Peanut Butter & Jelly Cheesecake
-
Cream cheese
-
Creamy peanut butter
-
Granulated sugar
-
Eggs
-
Vanilla extract
-
Graham cracker crumbs (or digestive biscuits)
-
Melted butter
-
Your choice of jelly (strawberry, raspberry, blueberry, or mixed berry)
How to Prepare Peanut Butter & Jelly Cheesecake
Creating this cheesecake is much simpler than it appears. The recipe follows straightforward steps that guarantee a creamy texture, a firm crust, and a perfectly balanced swirl of peanut butter and jelly. With some preparation and patience, you will have a dessert that looks elegant but feels approachable.
Step-by-Step Instructions for Preparation
Step 1 – Prepare the crust
Start with the base, because a strong crust supports the creamy filling. Crush the graham crackers or digestive biscuits until they form fine crumbs. Pour the melted butter over the crumbs and stir until every piece is coated. The mixture should look like damp sand. Press it firmly into the bottom of a springform pan, making sure it is even and compact. Use the bottom of a glass to flatten the crust so it stays stable once baked. Pre-bake the crust for a few minutes to set it before adding the filling.
Step 2 – Make the peanut butter cheesecake filling
In a large mixing bowl, beat the cream cheese until smooth and creamy. Add sugar gradually, mixing until fully incorporated. Blend in the peanut butter, making sure it combines evenly with the cream cheese. Add vanilla extract for extra depth of flavor. Next, add the eggs one at a time, mixing on low speed until just combined. Do not overmix, as too much air can cause cracks in the cheesecake while baking. The filling should be thick, smooth, and slightly glossy.
Step 3 – Pour and smooth the filling
Once the filling is ready, pour it onto the cooled crust. Spread it evenly with a spatula so the surface is smooth and level. At this stage, you will notice how rich and creamy the mixture looks.
Step 4 – Add the jelly swirl
Warm the jelly slightly to make it easier to drizzle. Place small spoonfuls of jelly on top of the cheesecake filling. Use a skewer or knife tip to create swirls, gently dragging through the surface without mixing too deeply into the filling. This step not only adds flavor but also creates a beautiful marbled effect that makes the cheesecake visually appealing.
Step 5 – Bake the cheesecake
Place the pan into a preheated oven with a tray of water on the bottom rack. This gentle steam prevents cracks from forming on the surface. Bake until the edges are set but the center still has a slight wobble. When finished, turn off the oven, open the door slightly, and allow the cheesecake to cool gradually. Rapid cooling can cause surface cracks.
Step 6 – Chill the cheesecake
Once at room temperature, cover and refrigerate the cheesecake for several hours, preferably overnight. This resting time allows the flavors to blend fully and the texture to firm into a smooth, creamy consistency.
Step 7 – Serve and enjoy
Remove the cheesecake from the springform pan carefully. Slice with a sharp knife dipped in warm water for clean edges. Each slice reveals the creamy peanut butter filling contrasted with vibrant swirls of jelly. It is rich, smooth, and deeply satisfying.
Quick and Easy
Although it looks impressive, this cheesecake is surprisingly easy. The crust takes only a few minutes, and the filling comes together in one bowl. The jelly swirl is playful and requires no special skills. With clear steps, even beginners can achieve bakery-quality results at home.
Customizable
One of the best things about this recipe is its flexibility. You can choose any jelly flavor you love most. If you enjoy a nutty crunch, you can also sprinkle crushed peanuts on top before baking or add them as a garnish after chilling. The crust can be switched to chocolate cookies for a richer dessert. Each change personalizes the cheesecake without affecting its overall success.
Popular with Many People
This cheesecake always draws attention at gatherings. The flavor combination appeals to children because of its familiar PB&J profile, yet adults appreciate the rich creaminess and playful nostalgia. It works as a birthday dessert, a casual family treat, or even as a festive centerpiece during holidays. People of all ages love the balance of nutty, fruity, and creamy flavors.
Print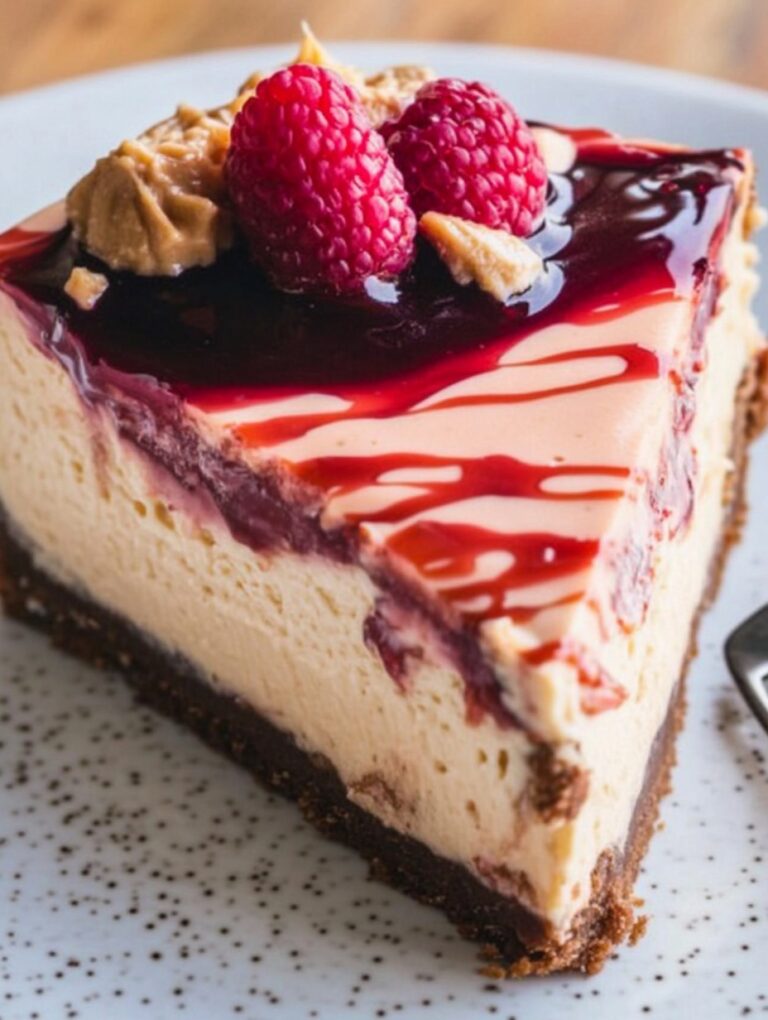
Peanut Butter & Jelly Cheesecake
This Peanut Butter & Jelly Cheesecake is a fun, creamy, and nostalgic dessert. Combining the richness of peanut butter, the smoothness of cream cheese, and the fruity brightness of jelly, it offers a balanced flavor and an attractive presentation. Perfect for family gatherings, birthdays, or casual desserts, it’s easy to make, customizable, and universally loved.
- Total Time: 1 hour 20 minutes
- Yield: 12 1x
Ingredients
Crust:
- 1 ½ cups graham cracker crumbs (or digestive biscuits)
- 5 tablespoons melted butter
Filling:
- 24 oz (680 g) cream cheese, softened
- 1 cup creamy peanut butter
- 1 cup granulated sugar
- 4 large eggs
- 1 teaspoon vanilla extract
Topping:
- ½ cup jelly (strawberry, raspberry, blueberry, or mixed berries)
Instructions
- Prepare the crust: Crush graham crackers until fine. Mix with melted butter until fully coated. Press mixture firmly into the bottom of a springform pan. Pre-bake for 8–10 minutes at 350°F (175°C).
- Make the filling: Beat cream cheese until smooth. Gradually add sugar and blend thoroughly. Mix in peanut butter and vanilla extract. Add eggs one at a time, blending gently. Avoid overmixing.
- Pour filling onto crust: Spread evenly with a spatula.
- Add jelly swirl: Warm jelly slightly and place spoonfuls on the filling. Use a skewer or knife to create swirls.
- Bake cheesecake: Place pan in a water bath and bake at 325°F (160°C) until edges are set and center slightly wobbly (about 50–60 minutes).
- Cool gradually: Turn off oven, open door slightly, and let cheesecake cool for 1 hour.
- Chill: Refrigerate for at least 4 hours or overnight.
- Serve: Remove from pan and slice with a warm knife for clean cuts.
Notes
Use your favorite jelly flavor to customize the cheesecake.
For added texture, sprinkle crushed peanuts on top before or after baking.
Avoid overmixing eggs to prevent cracks.
- Prep Time: 20
- Cook Time: 60
FAQs
1. Can I use crunchy peanut butter instead of creamy?
Yes, you can substitute crunchy peanut butter if you prefer some texture in your cheesecake. The filling will have small peanut pieces, adding a slight crunch to each bite.
2. Can I make this cheesecake in advance?
Absolutely. In fact, making it a day ahead allows the flavors to meld beautifully. Store it in the refrigerator, covered tightly, and it will remain fresh for up to 3–4 days.
3. Can I use a different type of crust?
Yes, you can replace the graham cracker crust with digestive biscuits, chocolate cookies, or even crushed nut-based crackers. Each option will subtly change the flavor and texture but still complement the peanut butter filling.
4. How do I prevent cracks on top of the cheesecake?
Avoid overmixing the eggs into the filling. Bake the cheesecake in a water bath and allow it to cool gradually in the oven with the door slightly open. This method helps maintain a smooth surface.
5. Can I freeze this cheesecake?
Yes, you can freeze the cheesecake. Wrap it tightly in plastic wrap and aluminum foil. Thaw it in the refrigerator overnight before serving. The texture may be slightly firmer, but the flavor will remain delicious.
6. Can I use a different jelly flavor?
Yes, any fruit jelly works. Strawberry, raspberry, blueberry, or mixed berries are excellent choices. You can even swirl multiple flavors for a colorful and flavorful presentation.