

Every year, when Valentine’s Day approaches, I find myself inspired to create something that is both indulgent and heartfelt. One of my favorite recipes to prepare for this special occasion is the Valentine’s Heart Treat with Chocolate and Peanut Butter Delight. This recipe brings together two timeless flavors – chocolate and peanut butter – in a charming heart-shaped form that is perfect for sharing with loved ones. I remember the very first time I made this treat; I was searching for a way to surprise my family with something sweet, but also simple enough to prepare in one afternoon. The result was a beautiful and delicious dessert that quickly became a tradition in my kitchen.
You will love this recipe because it captures the essence of Valentine’s Day with minimal effort and maximum flavor. The smooth, creamy peanut butter filling balances perfectly with the rich, velvety layer of chocolate. Each bite melts in your mouth and delivers a satisfying contrast between sweetness and nuttiness. It’s the kind of treat that feels indulgent without requiring complicated steps or expensive ingredients. Whether you are preparing it for your partner, your children, or even just yourself, this recipe is guaranteed to put a smile on faces.
Another reason this recipe stands out is its versatility. The heart-shaped design makes it ideal for Valentine’s Day, but the concept works just as well for birthdays, anniversaries, or festive gatherings. You can easily swap the heart mold for stars, flowers, or simple squares to suit different occasions. Additionally, you can adjust the chocolate layer to your preference – whether you enjoy the intensity of dark chocolate, the sweetness of milk chocolate, or the creaminess of white chocolate. Even the peanut butter filling can be adapted by adding a touch of honey, a sprinkle of sea salt, or a handful of crushed nuts for extra texture.
Affordability is another great advantage. This recipe requires only a few basic ingredients that are easy to find in any supermarket. There’s no need for fancy tools or rare products, making it accessible for bakers at all levels. The simplicity of the preparation means you don’t have to spend hours in the kitchen, yet the end result looks and tastes as though it came from a professional bakery. That combination of elegance and ease makes it a perfect dessert option.
Ingredients for the Recipe:
-
Chocolate (dark, milk, or white, depending on preference)
-
Creamy peanut butter
-
Powdered sugar
-
Unsalted butter
-
Vanilla extract
-
Pinch of salt
-
Optional decorations (sprinkles, drizzled chocolate, or edible glitter)
How to Prepare This Recipe
Making the Valentine’s Heart Treat with Chocolate and Peanut Butter Delight is one of the most enjoyable baking projects I look forward to during Valentine’s season. The process is quick, simple, and very rewarding. The recipe does not require advanced baking techniques, and even beginners can master it with ease. The combination of chocolate and peanut butter works beautifully, and shaping them into hearts makes the treat extra special. Below, I will guide you through the preparation step by step, ensuring every detail is clear and easy to follow.
Step-by-Step Instructions for Preparation
Step 1: Prepare the chocolate base
Start by melting your chosen chocolate. You can use dark chocolate for a rich flavor, milk chocolate for a sweeter bite, or white chocolate for a creamy twist. To melt the chocolate, place it in a heatproof bowl set over a pot of simmering water. Stir gently until smooth and glossy. Alternatively, you can melt it in the microwave in 20-second bursts, stirring between each interval to prevent burning. Once melted, spoon a small amount into silicone heart molds. Spread the chocolate evenly with the back of a spoon so it coats the bottom and sides of each mold. Place the molds in the freezer for 10 minutes to firm up.
Step 2: Make the peanut butter filling
While the chocolate is setting, prepare the creamy peanut butter filling. In a medium bowl, combine peanut butter, softened unsalted butter, powdered sugar, vanilla extract, and a pinch of salt. Mix until the filling is smooth and thick, yet soft enough to shape. If you prefer a slightly sweeter filling, you can add an extra spoonful of powdered sugar. For a touch of crunch, fold in crushed nuts. This filling should be soft but not runny, as it needs to hold its shape inside the chocolate shell.
Step 3: Fill the chocolate shells
Remove the molds from the freezer and spoon a small portion of the peanut butter mixture into the center of each chocolate-coated heart. Gently press the filling down so it spreads evenly but does not reach the edges of the mold. Leaving a thin border allows the top chocolate layer to seal the treat properly. Continue until all molds are filled.
Step 4: Seal with more chocolate
Melt more chocolate and spoon it over the peanut butter filling, covering it completely. Smooth the surface with the back of a spoon or a spatula. Make sure the filling is fully enclosed so it does not leak out. Once finished, place the molds back in the freezer for at least 20 minutes or until completely firm.
Step 5: Unmold and decorate
When the chocolate has hardened, gently pop each heart out of the silicone mold. Arrange them on a tray lined with parchment paper. At this stage, you can leave them plain for a simple and elegant look, or decorate them with a drizzle of contrasting chocolate, a sprinkle of crushed nuts, or edible glitter for extra charm. These finishing touches make the hearts even more festive and appealing.
Quick and Easy
This recipe does not require baking, making it one of the quickest desserts to prepare. The steps involve only melting, mixing, and chilling, which means you can have a beautiful Valentine’s dessert ready in under an hour. It is also mess-free, as most of the work is done in molds.
Customizable
The beauty of this recipe lies in its adaptability. You can switch between different chocolates to suit your taste, add flavors like cinnamon or espresso to the peanut butter filling, or even use almond butter for variation. If you want to make the treat extra special, you can add a thin layer of caramel or fruit jam between the chocolate and peanut butter. These adjustments let you personalize the recipe for different occasions and preferences.
Popular with Many People
The combination of chocolate and peanut butter has always been a crowd favorite, and this recipe proves it once again. These heart-shaped delights are perfect for gifting, serving at parties, or enjoying with your family. They are bite-sized, portable, and universally appealing. Whenever I prepare them, they disappear quickly from the serving tray. Their charm lies not only in the taste but also in their festive presentation.
Print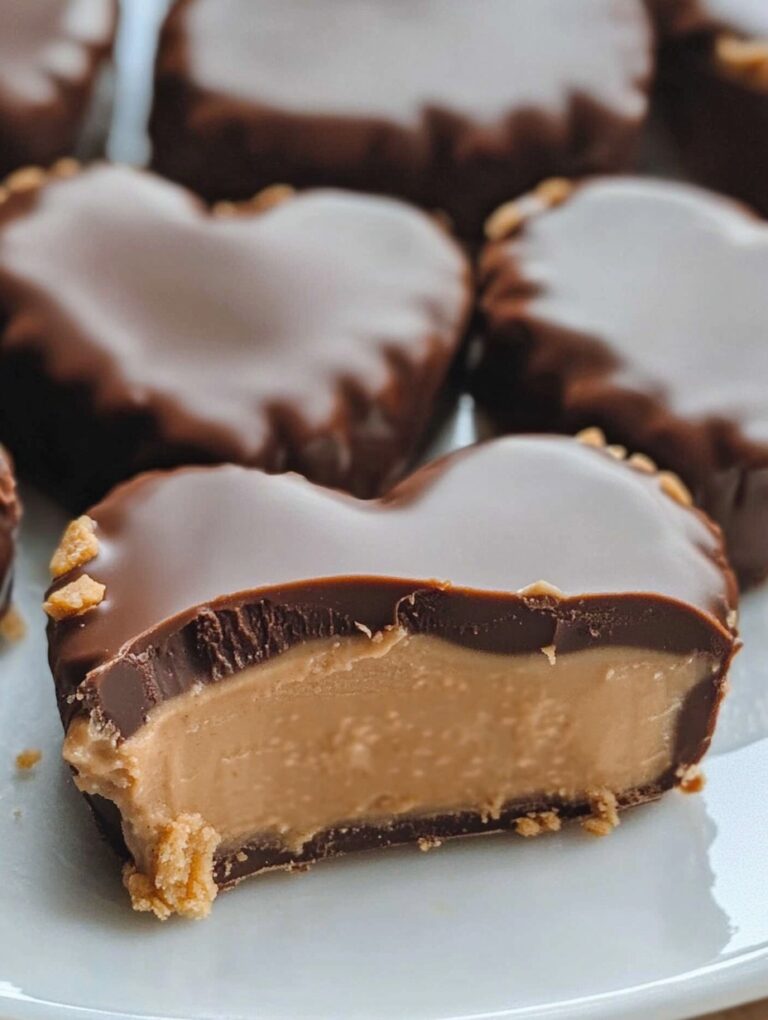
Valentine’s Heart Treat with Chocolate and Peanut Butter Delight
The Valentine’s Heart Treat with Chocolate and Peanut Butter Delight is a no-bake dessert that combines creamy peanut butter and rich chocolate in a festive heart shape. Perfect for Valentine’s Day or any special occasion, it’s quick to prepare, customizable, and loved by people of all ages.
- Total Time: 20 minutes
- Yield: 12
Ingredients
- Chocolate (dark, milk, or white) – 200 g
- Creamy peanut butter – 150 g
- Unsalted butter – 50 g, softened
- Powdered sugar – 100 g
- Vanilla extract – 1 teaspoon
- Pinch of salt
- Optional decorations: sprinkles, drizzled chocolate, edible glitter, crushed nuts
Instructions
- Melt the chocolate in a heatproof bowl over simmering water or in short microwave bursts until smooth.
- Spoon a small amount of melted chocolate into silicone heart molds, spreading it evenly along the bottom and sides. Freeze for 10 minutes to firm.
- In a medium bowl, combine peanut butter, softened butter, powdered sugar, vanilla extract, and a pinch of salt. Mix until smooth and thick. Add optional crushed nuts if desired.
- Remove the chocolate molds from the freezer and spoon the peanut butter mixture into the center of each chocolate shell, leaving a thin border around the edges.
- Melt additional chocolate and cover the peanut butter filling completely. Smooth the surface with a spoon or spatula.
- Place the molds in the freezer for at least 20 minutes until completely firm.
- Carefully unmold the chocolate hearts and arrange them on a tray lined with parchment paper.
- Decorate as desired with sprinkles, drizzled chocolate, or edible glitter. Serve chilled.
Notes
Store in an airtight container in the refrigerator for up to one week.
For a sweeter or crunchier filling, adjust powdered sugar or add nuts.
Can be made in various chocolate types or shapes to suit occasions.
- Prep Time: 20
FAQs
Q1: Can I make these heart treats ahead of time?
Yes, you can prepare them a few days in advance. Store them in an airtight container in the refrigerator for up to a week. They maintain their flavor and texture well when chilled.
Q2: Can I use crunchy peanut butter instead of creamy?
Absolutely. Using crunchy peanut butter adds a delightful texture to the filling. Just make sure to mix it well with the butter and powdered sugar so the consistency is easy to scoop and shape.
Q3: Can I substitute the chocolate with sugar-free or dairy-free options?
Yes, you can use sugar-free chocolate, vegan chocolate, or dairy-free alternatives. Make sure to adjust the melting process according to the product instructions to avoid seizing or burning.
Q4: Can I make these treats larger or smaller than the mold size?
Certainly. The recipe is flexible. If you use larger molds, increase the filling slightly, and if using smaller molds, reduce the filling to fit properly. Keep in mind that larger hearts may require extra chilling time.
Q5: How do I prevent the chocolate from melting when serving?
Serve the treats chilled, and avoid leaving them in a warm environment for long periods. If gifting, place them in a cool, insulated box to maintain their shape.
Q6: Can I add decorations?
Yes, decorations such as sprinkles, drizzled chocolate, edible glitter, or crushed nuts enhance the appearance and make them festive. Decorate just before serving for the best presentation.