
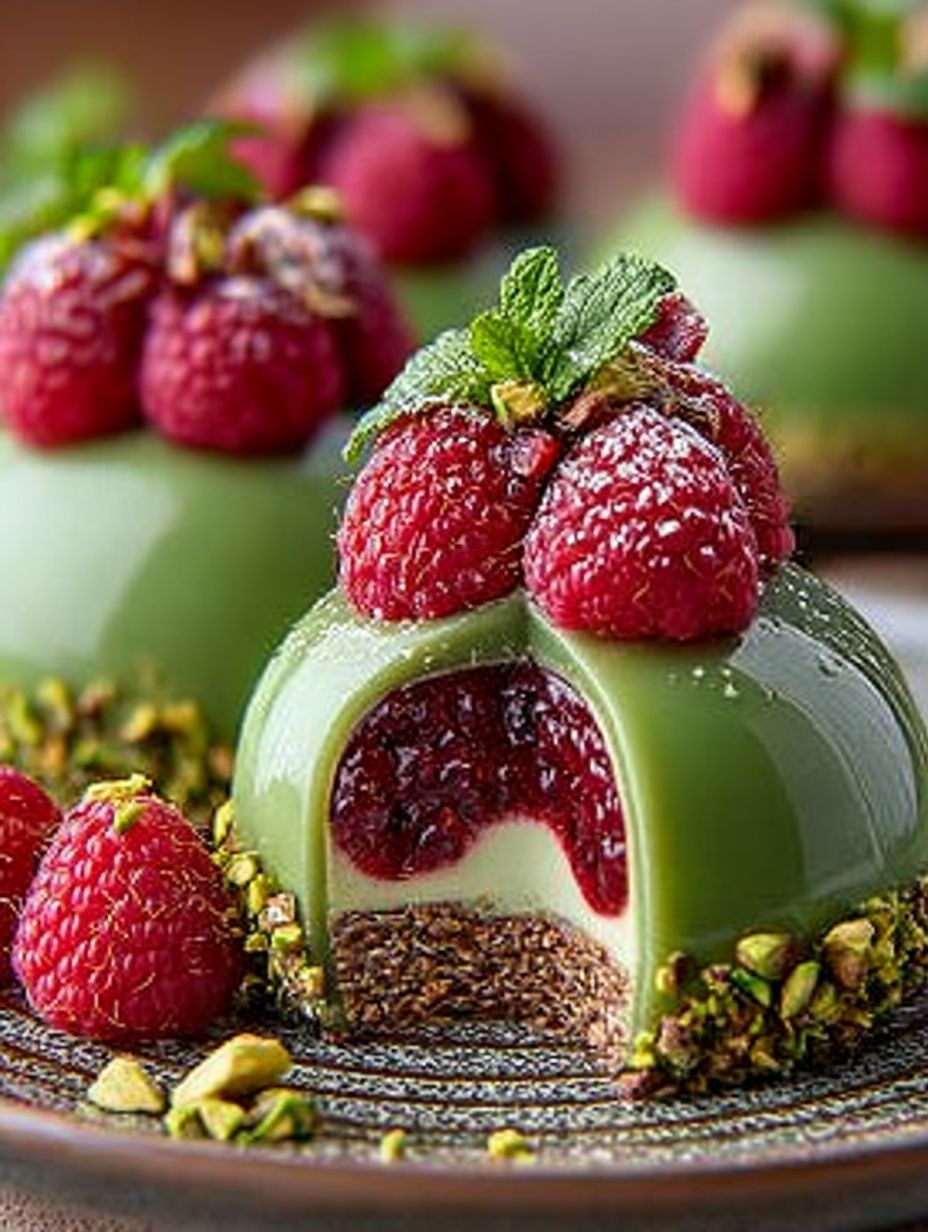
Imagine sinking your teeth into a cloud-like dome of creamy pistachio bliss, each bite bursting with the tart sweetness of fresh raspberries. The velvety texture plays a delightful game with your palate, making every mouthful an explosion of flavor and joy.
I still remember the first time I attempted to make Pistachio Raspberry Domes. Let’s just say my kitchen looked like a sweet explosion had occurred. There were more ingredients on the counter than in the bowls, and I may or may not have ended up with more pistachio dust on my face than in the mix. But hey, it was a delicious disaster that only fueled my determination to master this stunning dessert.
Why You’ll Love This Recipe
Pistachio Raspberry Domes are not just a treat for the taste buds; they are a feast for the eyes too! With easy preparation steps that even a novice can tackle, these domes boast a unique flavor profile combining nutty pistachios and tangy raspberries. Their stunning appearance will have your friends and family convinced you’ve spent hours in the kitchen, while their versatility allows you to customize flavors or swap out fruits based on what’s in season. Get ready to impress without breaking a sweat!
Ingredients for Pistachio Raspberry Domes
Here’s what you need for this delicious dish:
How to Make Pistachio Raspberry Domes

Follow these simple steps to prepare this delicious dish:
Step 1: Prepare Your Molds
Start by lightly greasing your silicone dome molds with coconut oil to ensure easy release later. Preheat your oven to 350°F (175°C). This ensures that everything is ready when you dive into action.
Step 2: Create the Pistachio Base
In a food processor, combine 1 cup of shelled pistachios with 1 tablespoon of maple syrup and pulse until finely ground but not mushy—aim for that perfect crumbly texture! Add 2 tablespoons melted coconut oil and blend until combined. Evenly press this mixture into the bottom of each dome mold, creating a solid base.
Step 3: Make Your Raspberry Filling
In a saucepan over medium heat, combine 1 cup fresh raspberries with 2 tablespoons maple syrup and cook until soft—about 5 minutes. Mash them slightly with a fork to break them down further. In another bowl, mix together 1 cup plant-based cream cheese, 1/4 cup almond milk, juice from half a lemon, and 2 teaspoons agar-agar powder (previously dissolved in 3 tablespoons warm water). Stir until smooth before folding in your raspberry mixture.
Step 4: Assemble Your Domes
Carefully spoon the raspberry filling over each pressed pistachio base in your molds. Smooth out the tops using a spatula or back of a spoon—perfection is key here! Now comes patience; place them in the fridge for at least three hours until set.
Step 5: Unmold & Serve
Once set, carefully pop each dome out of its mold by gently pushing from underneath. Place them on serving plates and garnish with fresh raspberries or chopped pistachios for an elegant touch. Drizzle with some extra maple syrup if you’re feeling adventurous!
Now gather your friends around as you serve these beautiful Pistachio Raspberry Domes! Garnish with fresh mint or edible flowers if you’re feeling fancy but remember: they shine alone too! Enjoy right away to appreciate their creamy texture and vibrant flavors at their best!
Perfecting the Cooking Process
To create perfect Pistachio Raspberry Domes, start by preparing the raspberry layer first. This allows it to set while you work on the pistachio filling, ensuring a smooth assembly later.
Add Your Personal Touch
Feel free to swap in almonds instead of pistachios for a different nutty flavor. You could also use blueberries or blackberries in place of raspberries for a berry twist!
Storage & Reheating
To maintain the delightful texture of your Pistachio Raspberry Domes, store the domes in an airtight container and refrigerate. They are best enjoyed fresh, so assemble just before serving.
Helpful Chef Tips
I still remember the first time I made these Pistachio Raspberry Domes for a friend’s birthday. The look of surprise when he tasted them was absolutely priceless!
Conclusion for Pistachio Raspberry Domes
Creating these Pistachio Raspberry Domes is not just about enjoying a delicious dessert; it’s an experience that tantalizes your taste buds and delights the senses. The creamy pistachio layer combined with the fresh raspberry base offers a perfect balance of flavors. Plus, this recipe is versatile and can be adapted to various dietary needs while still being indulgent. Don’t miss the chance to impress your family and friends with this stunning treat. Grab your ingredients today and dive into making these delightful domes!
Print
Pistachio Raspberry Domes
Delicious pistachio raspberry domes recipe with detailed instructions and nutritional information.
- Total Time: 1 hour 30 minutes
- Yield: 6 servings 1x
Ingredients
- 1 cup shelled pistachios, unsalted
- 1 tablespoon maple syrup
- 2 tablespoons melted coconut oil
- 1 cup fresh raspberries
- 2 tablespoons maple syrup
- 1 cup plant-based cream cheese, softened
- 1/4 cup almond milk, unsweetened
- juice from 1/2 lemon
- 2 teaspoons agar-agar powder
- 3 tablespoons warm water
- melted coconut oil for greasing molds
Instructions
- Start by lightly greasing your silicone dome molds with coconut oil.
- Preheat your oven to 350°F (175°C).
- In a food processor, combine 1 cup of shelled pistachios with 1 tablespoon of maple syrup and pulse until finely ground but not mushy.
- Add 2 tablespoons melted coconut oil and blend until combined.
- Evenly press this mixture into the bottom of each dome mold, creating a solid base.
- In a saucepan over medium heat, combine 1 cup fresh raspberries with 2 tablespoons maple syrup and cook until soft—about 5 minutes.
- Mash them slightly with a fork to break them down further.
- In another bowl, mix together 1 cup plant-based cream cheese, 1/4 cup almond milk, juice from half a lemon, and 2 teaspoons agar-agar powder (previously dissolved in 3 tablespoons warm water).
- Stir until smooth before folding in your raspberry mixture.
- Carefully spoon the raspberry filling over each pressed pistachio base in your molds.
- Smooth out the tops using a spatula or back of a spoon.
- Place them in the fridge for at least three hours until set.
- Once set, carefully pop each dome out of its mold by gently pushing from underneath.
- Place them on serving plates and garnish with fresh raspberries or chopped pistachios.
- Drizzle with some extra maple syrup if you’re feeling adventurous.
Notes
Store domes in airtight container, refrigerate for freshness.
Enjoy chilled; no reheating needed!
Serve with fresh mint sprigs for garnish.
Use quality pistachios for rich flavor.
- Prep Time: 45 minutes
- Cook Time: 45 minutes
- Method: Bake
Nutrition
- Calories: 250 kcal
- Sugar: 8g
- Sodium: 150mg
- Fat: 12g
- Carbohydrates: 32g
- Fiber: 4g
- Protein: 6g
- Cholesterol: 25mg
FAQs
How can I store the Pistachio Raspberry Domes?
To store your Pistachio Raspberry Domes, place them in an airtight container in the refrigerator. They will stay fresh for up to three days. If you want to enjoy them later, you can freeze them. Just ensure they are well-wrapped to prevent freezer burn. When ready to eat, thaw them in the fridge for a few hours before serving.
Can I use different fruits instead of raspberries?
Yes, you can experiment with other fruits if you prefer! While raspberries provide a great tartness that complements the pistachio flavor, fruits like strawberries or blueberries can work wonderfully as substitutes. Just remember to adjust the sweetness based on the fruit’s natural sugar levels.
Is it possible to make these domes vegan?
Absolutely! To make your Pistachio Raspberry Domes vegan, simply replace any dairy products with plant-based alternatives. Use coconut cream or almond milk for creaminess and ensure that any gelling agents used are plant-based, such as agar-agar or pectin.
How long does it take to prepare and set the Pistachio Raspberry Domes?
The preparation time for the Pistachio Raspberry Domes is about 30 minutes. However, allow at least 4 hours for them to set properly in the refrigerator before serving. For best results, consider making them a day in advance so they can fully develop their flavors and textures overnight!