
There’s something irresistibly nostalgic about chocolate and cherries. I still remember the first time I made this Chocolate Cherry Cream Pie — it was a chilly Sunday afternoon, and I wanted to surprise my family with something indulgent yet comforting. The scent of melting chocolate and simmering cherries filled the kitchen, and by the time the pie was ready, we were all gathered around, impatiently waiting for that first slice. It didn’t last long on the table.
This pie holds a special place in my recipe collection because it brings people together. It’s the kind of dessert that makes guests ask for seconds (and the recipe), and it’s one of the first things I reach for when I want to share a little joy.
Why You’ll Love This Recipe
You’ll love this Chocolate Cherry Cream Pie because it’s the perfect blend of flavors and textures. The silky chocolate base melts in your mouth, while the tart cherries cut through with their brightness. The creamy topping adds a soft, luxurious finish, making every bite feel indulgent without being heavy.
This is not your average pie. It’s made with love, layered with flavor, and designed to impress without requiring hours in the kitchen. Whether you’re baking for a weekend treat, a dinner party, or just to satisfy your sweet tooth, this pie always delivers.
A Versatile Dessert for Any Occasion
One of the best things about this recipe is how versatile it is. You can prepare it as a classic pie or adapt it into individual tartlets for a more elegant presentation. It’s perfect for year-round enjoyment. In summer, it’s refreshing chilled. During the holidays, it offers a rich contrast to spiced treats.
Need to make it ahead of time? You can! The pie sets beautifully in the fridge and holds up well for serving the next day. You can even tweak the filling — try swapping cherries for raspberries or a berry medley, depending on what’s in season.
Affordable Ingredients You Probably Already Have
You won’t need a trip to a specialty store for this one. The ingredients are simple and budget-friendly:
-
Chocolate (semisweet or dark)
-
Heavy cream
-
Cherries (fresh or canned in juice)
-
Cream cheese
-
Sugar
-
Cornstarch
-
Vanilla extract
-
A ready-made or homemade pie crust
Most of these are pantry staples or easy finds at any local grocery. The result? A bakery-quality pie at a fraction of the cost.
How to Prepare This Chocolate Cherry Cream Pie
Step-by-Step Instructions for Preparation
This pie may look impressive, but I promise you — it’s surprisingly simple to make. With just a few basic techniques and some chilling time, you’ll have a bakery-worthy dessert without the stress.
Step 1: Prepare the Crust
You can use a store-bought pie crust for convenience or make your own using crushed digestive biscuits or graham crackers mixed with melted butter.
-
Preheat your oven to 175°C (350°F).
-
Press the crust mixture into the base and sides of a 23cm (9-inch) pie dish.
-
Bake for 8–10 minutes, until lightly golden.
-
Let it cool completely before filling.
Tip: To save time, you can also use a pre-baked crust — just skip the baking step above.
Step 2: Make the Cherry Filling
This cherry layer adds a fruity tang that balances the richness of the chocolate cream.
-
In a medium saucepan over medium heat, combine:
-
2 cups of pitted cherries (fresh or canned in juice)
-
2 tablespoons of sugar
-
1 tablespoon of cornstarch dissolved in 2 tablespoons of water
-
-
Stir constantly until the mixture begins to thicken — about 5–7 minutes.
-
Once thickened and glossy, remove from heat and let it cool.
Note: If using canned cherries, drain them first and reserve a bit of the juice to enhance flavor.
Step 3: Prepare the Chocolate Cream Layer
This layer is velvety, smooth, and packed with chocolate flavor.
-
In a saucepan, heat 1 cup of heavy cream until it just starts to simmer.
-
Remove from heat and pour over 200g of chopped dark or semisweet chocolate in a bowl.
-
Let it sit for 2 minutes, then stir until smooth.
-
In a separate bowl, beat 200g of cream cheese with 3 tablespoons of sugar and 1 teaspoon of vanilla extract until smooth.
-
Once the chocolate mixture is slightly cooled, fold it into the cream cheese mixture until well combined.
This is the heart of the pie — rich but not overpowering, and smooth as silk.
Step 4: Assemble the Pie
Now the magic happens.
-
Spread the cherry filling evenly into the cooled crust.
-
Spoon the chocolate cream over the cherry layer and smooth the top with a spatula.
-
Cover loosely with cling film and chill in the fridge for at least 4 hours — preferably overnight — until fully set.
Step 5: Add the Cream Topping
Just before serving, top with a cloud of lightly whipped cream.
-
Whip 1 cup of cold heavy cream with 2 tablespoons of sugar and ½ teaspoon of vanilla until soft peaks form.
-
Spread or pipe the whipped cream over the chocolate layer.
-
Optionally, garnish with shaved chocolate or a few whole cherries for a decorative finish.
Quick and Easy
Don’t let the multiple layers fool you — this pie is quick to prepare. The steps are simple and don’t require any advanced equipment. From crust to topping, it’s a manageable recipe you can master even on a busy day.
Most of the effort is in waiting for it to chill — which means you can make it the night before and have a stunning dessert ready to go without stress.
Customizable to Your Taste
What I love most about this recipe is how flexible it is. Prefer milk chocolate instead of dark? Go for it. Want to use mixed berries instead of just cherries? That works, too. You can even infuse the cream with instant coffee for a mocha twist.
This pie adapts easily to your preferences and to what you have on hand. It’s the kind of recipe you can personalize while still knowing it will turn out beautifully every time.
Loved by Everyone
Whether you’re serving kids, adults, or guests with sophisticated palates, this Chocolate Cherry Cream Pie never disappoints. It’s rich without being too sweet, fruity without being too tart, and creamy without being too heavy.
From birthdays to holiday tables to casual gatherings, it always disappears fast. It’s one of those crowd-pleasers that you’ll find yourself making again and again.
Print
Chocolate Cherry Cream Pie
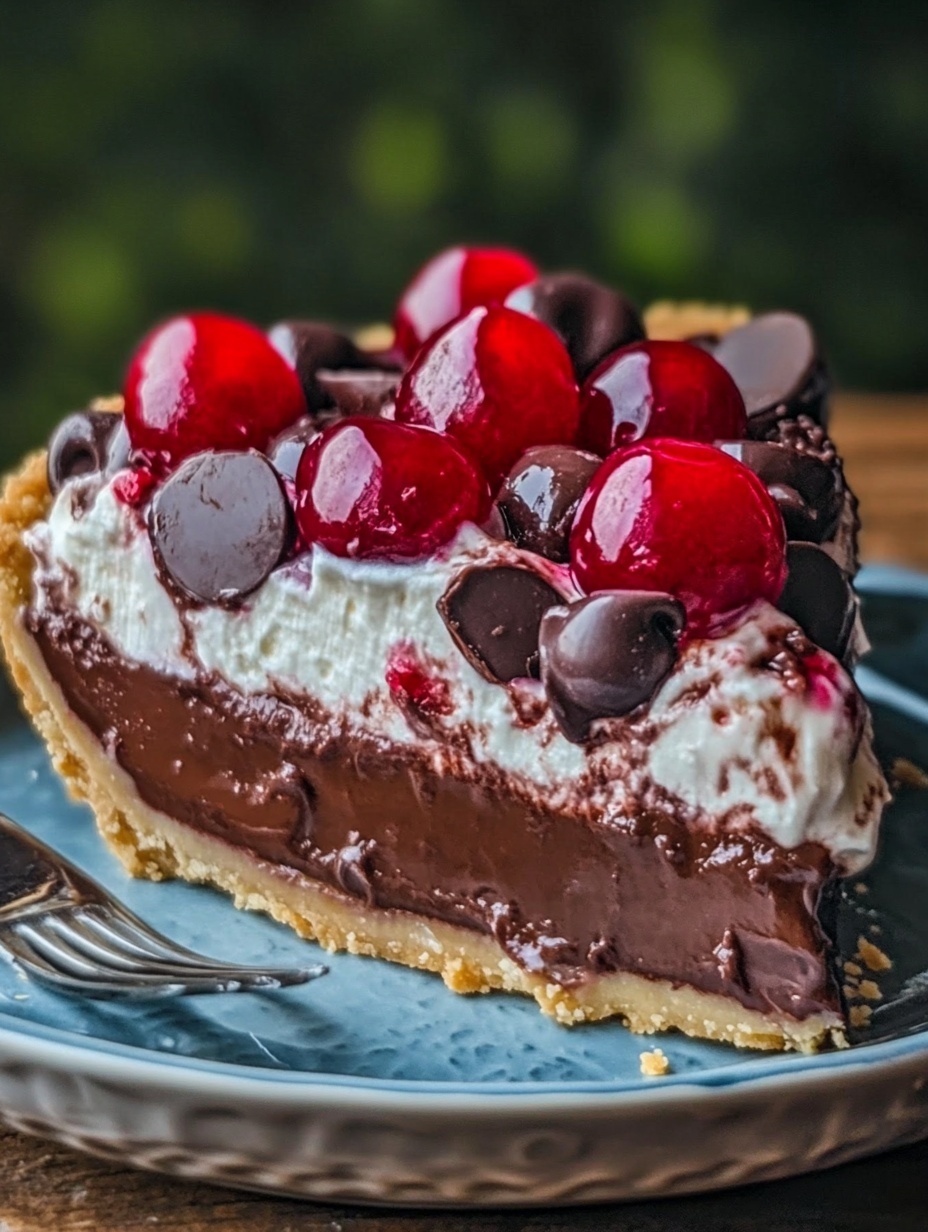
This Chocolate Cherry Cream Pie is a rich, elegant dessert that combines the deep flavor of chocolate with the bright tang of cherries and the smoothness of whipped cream. It features a buttery biscuit crust, a glossy homemade cherry compote, a luscious chocolate cream layer, and a topping of soft whipped cream. Perfect for special occasions or everyday indulgence, this no-fuss recipe is easy to prepare and always impresses.
- Total Time: 35 minutes
- Yield: 8 1x
Ingredients
For the crust:
- 1 ½ cups crushed graham crackers or digestive biscuits
- 6 tablespoons melted butter
For the cherry layer:
- 2 cups pitted cherries (fresh, frozen, or canned in juice)
- 2 tablespoons sugar
- 1 tablespoon cornstarch
- 2 tablespoons water
For the chocolate cream layer:
- 1 cup heavy cream
- 200g dark or semisweet chocolate, chopped
- 200g cream cheese, softened
- 3 tablespoons sugar
- 1 teaspoon vanilla extract
For the topping:
- 1 cup heavy cream
- 2 tablespoons sugar
- ½ teaspoon vanilla extract
Instructions
- Preheat your oven to 175°C (350°F).
- In a mixing bowl, combine 1 ½ cups of crushed graham crackers or digestive biscuits with 6 tablespoons of melted butter.
- Press the mixture evenly into the base and sides of a 23cm (9-inch) pie dish to form the crust.
- Bake the crust for 8 to 10 minutes, then remove it from the oven and let it cool completely.
- In a saucepan over medium heat, add 2 cups of pitted cherries and 2 tablespoons of sugar.
- In a small bowl, mix 1 tablespoon of cornstarch with 2 tablespoons of water to create a slurry, then stir it into the cherry mixture.
- Cook the cherry filling, stirring constantly, for 5 to 7 minutes until it thickens and becomes glossy. Remove from heat and allow it to cool.
- In a separate saucepan, heat 1 cup of heavy cream until it just begins to simmer, then pour it over 200g of chopped chocolate in a bowl. Let sit for 2 minutes.
- Stir the chocolate and cream mixture until smooth. In another bowl, beat 200g of cream cheese with 3 tablespoons of sugar and 1 teaspoon of vanilla until smooth, then fold in the chocolate mixture.
- Spread the cooled cherry filling over the prepared crust, then pour the chocolate cream on top and smooth the surface. Cover and refrigerate for at least 4 hours, preferably overnight.
- Just before serving, whip 1 cup of heavy cream with 2 tablespoons of sugar and ½ teaspoon of vanilla extract until soft peaks form. Spread or pipe the whipped cream over the pie, and garnish as desired.
Notes
Canned cherries in juice are convenient, but fresh or frozen work equally well.
The crust can be made a day ahead and stored at room temperature.
This pie is best served chilled and slices cleanly after being refrigerated overnight.
- Prep Time: 25
- Cook Time: 10
Frequently Asked Questions
Can I use frozen cherries instead of fresh or canned?
Yes, frozen cherries work perfectly in this recipe. Just thaw them completely and drain any excess liquid before using them in the filling. This helps prevent the pie from becoming watery.
Can I make this pie in advance?
Absolutely. This pie is ideal for making ahead of time. Prepare it the day before, refrigerate it overnight, and add the whipped cream topping just before serving. The flavors develop even more with time.
What can I use instead of cream cheese?
If you don’t have cream cheese, mascarpone is a great alternative. It gives a slightly richer texture. Greek yogurt can also work for a lighter version, though the texture will be softer.
Can I make it without a crust?
You can serve the filling in cups or ramekins as a crustless dessert. Simply layer the cherry and chocolate cream in individual serving glasses and chill them. It’s a beautiful presentation and still delicious.
How do I store leftovers?
Store leftover pie covered in the refrigerator for up to 3 days. The crust may soften slightly over time, but the flavor will remain rich and delicious.
Can I freeze this pie?
You can freeze the pie without the whipped topping. Wrap it tightly in plastic wrap and foil, then freeze for up to 1 month. Thaw in the fridge overnight and add the whipped cream just before serving.