
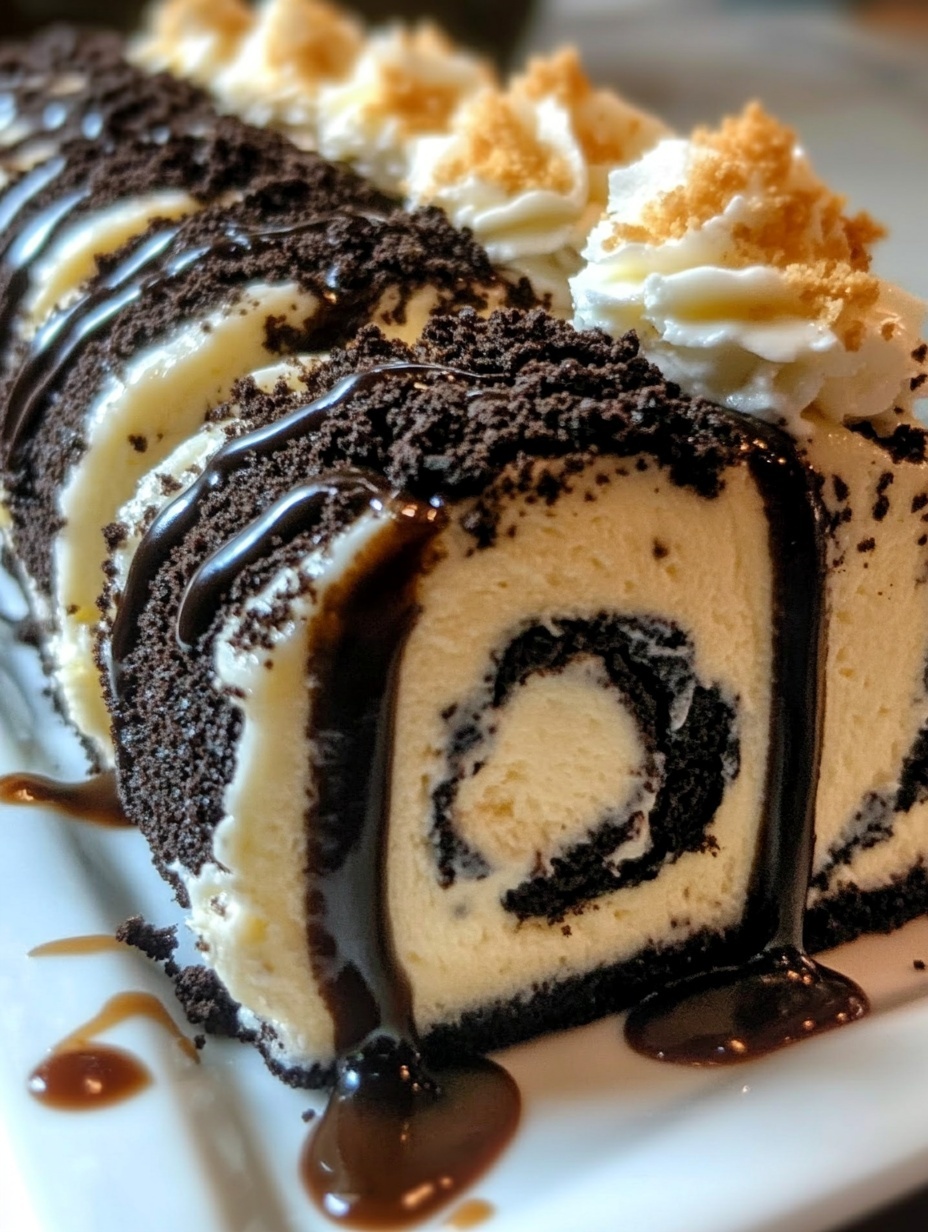
I have always loved experimenting with desserts that bring a touch of surprise to the table, and this Oreo Cream Cheese Cheesecake Sushi Roll Dessert is one of those creations that always makes people pause in delight. The first time I made it, I wanted to capture the creamy richness of cheesecake, the crunch of Oreos, and the fun presentation of sushi all in one playful recipe. It turned out to be the kind of dessert that looks sophisticated but is simple enough for any home baker to master. Every slice reveals a beautiful spiral of cream cheese filling wrapped in a rich Oreo base, making it not only delicious but also visually stunning.
What makes this recipe so special is its unexpected twist. Cheesecake and Oreos are a match made in heaven, but presenting them in a sushi roll style takes the experience to another level. It’s the perfect treat for parties, family gatherings, or even as a fun weekend baking project. Guests are always intrigued by the sushi roll presentation and pleasantly surprised when they take that first sweet bite. The creamy cheesecake center blends harmoniously with the crumbly Oreo layer, creating a texture and flavor combination that keeps everyone coming back for seconds.
Why You Will Love This Recipe
You will love this recipe because it balances indulgence with creativity. It’s rich and satisfying without being overwhelming. Unlike a traditional cheesecake, which can feel heavy, these sushi rolls are portioned into neat slices that make serving effortless. The presentation alone will impress your friends and family, but the taste will seal the deal. Plus, it requires no complicated equipment or advanced baking skills, which makes it accessible for both beginners and experienced bakers.
Versatile
One of the best parts about this Oreo Cream Cheese Cheesecake Sushi Roll is its versatility. You can easily adjust the flavor profile by adding flavored extracts to the cream cheese filling, using different varieties of Oreos such as golden or mint, or even incorporating a thin layer of fruit preserves for a fruity twist. It’s a dessert that can adapt to different occasions and personal preferences, which is why I keep coming back to it.
Affordable
Another advantage is affordability. The ingredients are budget-friendly and readily available in most grocery stores. Oreos, cream cheese, butter, and sugar form the backbone of this dessert, making it not only delightful but also cost-effective. You don’t need to spend a fortune to create a show-stopping treat that looks like it belongs in a gourmet bakery display.
Ingredients for the Recipe
-
Oreo cookies (regular or flavored of your choice)
-
Cream cheese
-
Powdered sugar
-
Unsalted butter
-
Vanilla extract
-
Optional: fruit preserves or cocoa powder for variation
How to Prepare Oreo Cream Cheese Cheesecake Sushi Roll Dessert
Step-by-Step Instructions for Preparation
Making this Oreo Cream Cheese Cheesecake Sushi Roll Dessert is both fun and rewarding. The preparation is straightforward, and with just a little patience, you’ll end up with a dessert that looks like it belongs in a showcase. Here’s exactly how I prepare it step by step.
Step 1: Prepare the Oreo Base
Start by placing the Oreo cookies into a food processor. Blend them until they turn into fine crumbs. If you do not have a processor, place the cookies in a sealed bag and crush them with a rolling pin until no large pieces remain. Once the crumbs are ready, transfer them into a bowl. Melt unsalted butter and pour it over the Oreo crumbs. Mix well until the crumbs are fully coated and resemble wet sand. This mixture will form the outer layer of your sushi roll.
Step 2: Shape the Oreo Layer
Lay out a large piece of parchment paper or plastic wrap on your work surface. Pour the Oreo and butter mixture onto it, then spread it evenly into a rectangle about half an inch thick. Use a spatula to press down firmly and ensure the surface is smooth and compact. This step is important because it keeps the roll from breaking apart later. Place the rectangle into the refrigerator to firm up for about 15 minutes while you prepare the cream cheese filling.
Step 3: Make the Cream Cheese Cheesecake Filling
In a mixing bowl, beat the cream cheese until smooth and creamy. Add powdered sugar gradually, whisking until the mixture becomes fluffy and sweet. Stir in a splash of vanilla extract for extra flavor. At this point, you can also customize the filling by adding cocoa powder, fruit preserves, or even a drop of mint extract depending on your personal preference. The goal is to create a creamy, sweet, and spreadable filling that contrasts nicely with the Oreo base.
Step 4: Assemble the Roll
Take the Oreo base out of the refrigerator. Spread the cream cheese filling evenly across the surface, leaving a small border around the edges. Make sure the filling layer is smooth but not too thick, as an overly heavy layer can make rolling more difficult. Once the filling is in place, carefully use the parchment paper or plastic wrap to roll the dessert tightly from one side to the other, just as you would roll sushi. Work slowly and evenly to prevent cracks or gaps.
Step 5: Chill the Roll
After rolling, wrap the dessert tightly in plastic wrap and place it in the refrigerator for at least 2 to 3 hours, or overnight if possible. This step allows the roll to firm up completely, making it much easier to slice into clean rounds. Patience here pays off with a professional-looking presentation.
Step 6: Slice and Serve
When ready to serve, remove the roll from the refrigerator and carefully unwrap it. Use a sharp knife to slice the roll into sushi-like pieces, wiping the blade between each cut to keep the edges neat. Arrange the slices on a serving platter, and if desired, dust lightly with powdered sugar or drizzle with a thin line of chocolate sauce. The rolls should hold their shape perfectly and reveal a striking spiral pattern inside.
Quick and Easy
This recipe is incredibly quick and easy to prepare compared to a traditional cheesecake. Instead of hours of baking and cooling, you simply mix, assemble, and chill. Most of the time required is hands-off chilling, giving you plenty of flexibility to prepare ahead for parties or gatherings.
Customizable
You can customize this dessert in endless ways. Use golden Oreos for a vanilla twist, mint Oreos for a refreshing flavor, or double-stuffed Oreos for extra richness. Add fresh fruit slices into the cream cheese filling for a fruity surprise, or sprinkle cocoa powder into the Oreo crust for an even deeper chocolate flavor. Each variation keeps the recipe exciting while maintaining its simple preparation.
Popular with Many People
What I love most about this Oreo Cream Cheese Cheesecake Sushi Roll Dessert is how universally popular it is. Children love the fun sushi presentation, adults appreciate the creamy richness, and everyone enjoys how easy it is to eat in neat little portions. It has become one of my most requested desserts for birthdays, holiday dinners, and even casual get-togethers. Its balance of flavor, texture, and visual appeal makes it a guaranteed crowd-pleaser every time.
Print
Oreo Cream Cheese Cheesecake Sushi Roll Dessert
This Oreo Cream Cheese Cheesecake Sushi Roll Dessert combines the creamy texture of cheesecake with the bold flavor of Oreos, all wrapped up in a playful sushi roll presentation. It’s simple to prepare, fun to serve, and makes a unique centerpiece for any gathering.
- Total Time: 25 minutes
- Yield: 14 1x
Ingredients
- 24 Oreo cookies (regular or flavored)
- 5 tablespoons unsalted butter, melted
- 8 oz cream cheese, softened
- ½ cup powdered sugar
- 1 teaspoon vanilla extract
- Optional: fruit preserves, cocoa powder, or flavored Oreos for variations
Instructions
- Place Oreos in a food processor and blend into fine crumbs. If you do not have a processor, crush them in a sealed bag with a rolling pin.
- Transfer crumbs to a bowl and mix with melted butter until fully coated. The mixture should resemble wet sand.
- Lay out parchment paper or plastic wrap on a flat surface. Spread the Oreo mixture evenly into a rectangle about ½ inch thick. Press down firmly with a spatula to compact the crust. Refrigerate for 15 minutes to set.
- In a mixing bowl, beat softened cream cheese until smooth. Gradually add powdered sugar, whisking until fluffy. Stir in vanilla extract. For variations, add cocoa powder, a spoonful of fruit preserves, or flavored extracts.
- Remove the Oreo base from the refrigerator. Spread the cream cheese filling evenly over the surface, leaving a small border around the edges.
- Using the parchment paper, carefully roll the dessert from one side to the other, forming a tight roll just like sushi. Work slowly to prevent cracks.
- Wrap the roll tightly in plastic wrap and refrigerate for at least 2 to 3 hours, or overnight for best results.
- When ready to serve, unwrap the roll and slice into even sushi-style rounds using a sharp knife. Wipe the blade clean between cuts for neat slices.
- Arrange on a serving platter. Optional: dust lightly with powdered sugar or drizzle with chocolate sauce before serving.
Notes
This dessert is no-bake and requires only refrigeration to set.
You can experiment with different Oreo flavors for endless variations.
Slices are portion-controlled, making this a great choice for parties and events.
- Prep Time: 25
FAQs
Can I make this dessert ahead of time?
Yes, this recipe is perfect for preparing in advance. The roll needs a few hours in the refrigerator to firm up, so making it the day before serving works wonderfully. Just keep it wrapped tightly in plastic wrap until you are ready to slice.
Do I need a food processor to crush the Oreos?
No, a food processor is not required. If you do not own one, simply place the Oreos in a strong plastic bag and crush them with a rolling pin until they turn into fine crumbs. This method works just as well.
Can I freeze the Oreo sushi roll?
Yes, you can freeze it. Wrap the roll securely in plastic wrap and then in foil to prevent freezer burn. Thaw it in the refrigerator before slicing. Freezing can slightly alter the texture, but the flavor remains delicious.
Can I use flavored Oreos?
Absolutely. Flavored Oreos such as mint, golden, or birthday cake add a unique twist to this recipe. Feel free to experiment based on your preference.
How do I keep my slices neat and clean?
Always use a sharp knife and wipe it clean after every cut. This prevents smudging and ensures beautiful, even slices.