
I still remember the first time I baked what I now call my Cherry Blossom Dream Cake. The inspiration came during a spring morning when cherry trees were in full bloom. Their soft pink petals falling gently in the breeze reminded me of a dessert that could capture that same elegance, lightness, and joy. I wanted to create a cake that would feel like taking a walk through a garden filled with blossoms – delicate, fragrant, and unforgettable. From that idea, this cake was born, and it quickly became one of the most requested recipes in my kitchen. Each bite is a reminder of how food can hold not just flavors, but memories and feelings as well.
Why You Will Love This Recipe
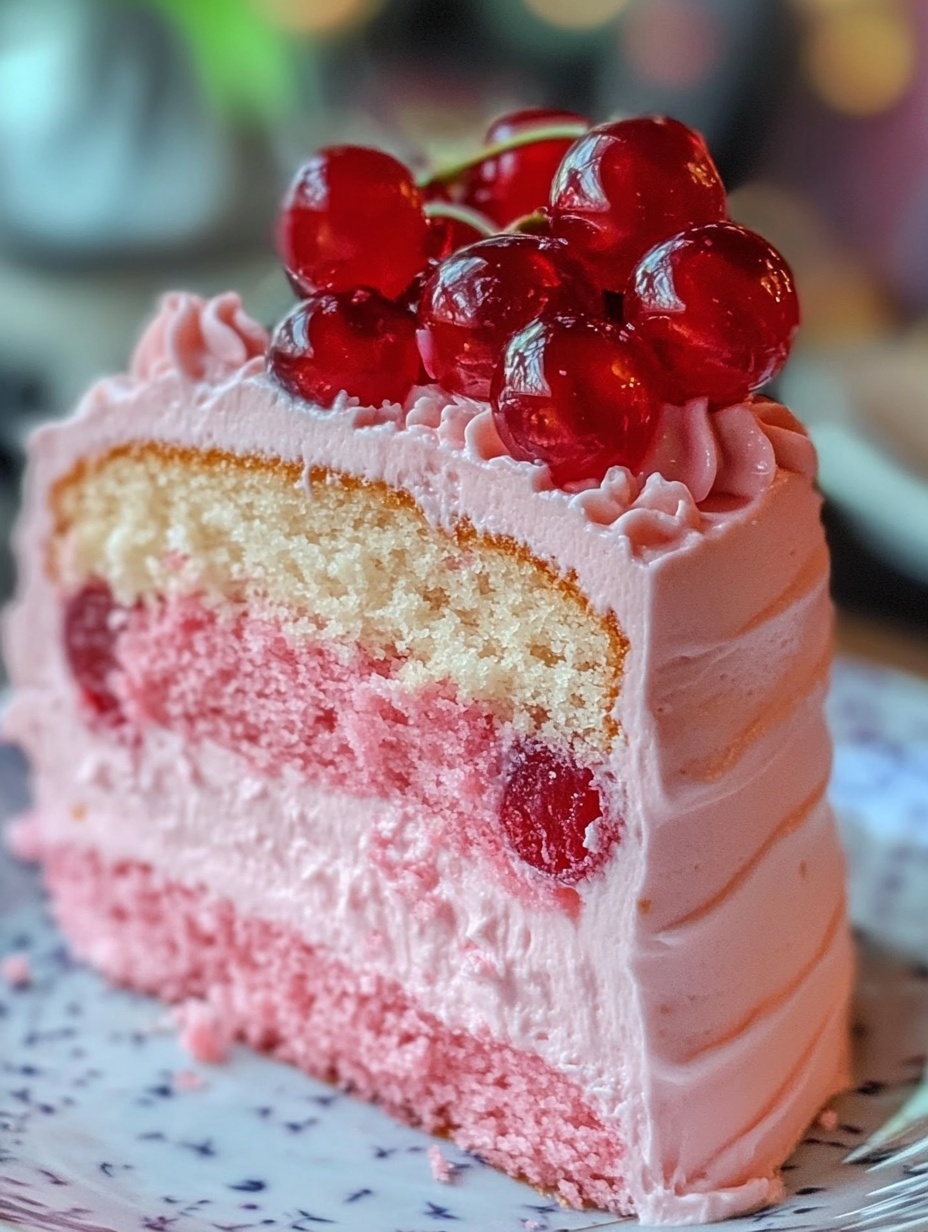
There are many reasons why the Cherry Blossom Dream Cake is bound to become one of your favorites. The first is its enchanting flavor. The cake layers are soft and moist, infused with hints of vanilla and almond that pair beautifully with a subtle cherry touch. The frosting is smooth and creamy, carrying just the right amount of sweetness without overpowering the delicate notes. Together, these elements create a balanced dessert that feels indulgent yet light.
Another reason is its beauty. Decorated with soft pastel colors and gentle details, this cake easily becomes the centerpiece of any celebration. Whether it’s for a birthday, a family gathering, or even a wedding-inspired dessert table, its look is as appealing as its taste. Baking it at home will not only bring a sense of accomplishment but also plenty of compliments from those who get to enjoy it.
Versatile
One of the things I love most about this recipe is its versatility. You can serve it in many different ways depending on the occasion. A simple version works perfectly for an afternoon treat with tea, while a more decorated version can grace festive events. The recipe can also be adjusted to suit your preference for sweetness, filling variations, or decoration styles. You can add fresh cherries between the layers, switch up the frosting, or even make mini cakes for individual servings. Its flexibility makes it a recipe worth keeping in your collection.
Affordable
Despite its elegant appearance, the Cherry Blossom Dream Cake is surprisingly affordable to make. The ingredients are basic pantry staples, such as flour, sugar, eggs, and butter, combined with a few extras to bring out the delicate cherry and almond flavors. Most of these items are easy to find and budget-friendly, so you don’t need to worry about breaking the bank. With a little creativity in presentation, this cake can look like something from a high-end bakery while still being kind to your wallet.
Ingredients for the Recipe
-
All-purpose flour
-
Granulated sugar
-
Baking powder
-
Salt
-
Unsalted butter
-
Eggs
-
Whole milk
-
Pure vanilla extract
-
Almond extract
-
Cherry preserve or cherry syrup
-
Heavy cream
-
Powdered sugar
-
Cream cheese or mascarpone (optional for frosting)
-
Pink food coloring (optional, for cherry blossom effect)
-
Fresh cherries or edible blossoms (for decoration)
How to Prepare This Recipe
Step-by-Step Instructions for Preparation
Making the Cherry Blossom Dream Cake may sound like a big task, but I promise it’s much easier than you might think. The process is straightforward, and with a little organization, you’ll have a beautiful cake ready to impress. Follow these steps carefully and you’ll be able to recreate the same dreamy texture and flavor in your own kitchen.
Step 1: Preparing the Baking Pans
Start by preheating your oven to 175°C (350°F). Grease and flour two or three round cake pans, depending on the number of layers you want for your cake. Lining the bottom with parchment paper makes removing the cakes easier and keeps the layers intact.
Step 2: Mixing the Dry Ingredients
In a large bowl, whisk together the all-purpose flour, baking powder, and salt. This step ensures the dry ingredients are evenly distributed, giving the cake a consistent rise and texture. Set this bowl aside.
Step 3: Creaming Butter and Sugar
In a separate mixing bowl, beat the softened butter and granulated sugar until the mixture becomes pale and fluffy. This step is key because it incorporates air into the batter, helping create a light and tender crumb in the finished cake.
Step 4: Adding Eggs and Flavoring
Add the eggs to the butter and sugar mixture, one at a time, beating well after each addition. Stir in the vanilla extract and almond extract. The almond extract complements the cherry flavor beautifully, while the vanilla adds warmth.
Step 5: Combining Wet and Dry Ingredients
Gradually add the dry ingredient mixture to the wet ingredients, alternating with the milk. Begin and end with the dry mixture. Mix on low speed until just combined. Overmixing can make the cake dense, so stop as soon as everything looks smooth.
Step 6: Adding Cherry Essence
At this stage, fold in a spoonful of cherry preserve or cherry syrup. This not only enhances the flavor but also gives the cake layers a faint blush of pink. If you want a more pronounced cherry blossom effect, add one or two drops of pink food coloring.
Step 7: Baking the Cake Layers
Divide the batter evenly among the prepared cake pans. Smooth the tops with a spatula and bake in the preheated oven for 25 to 30 minutes, or until a toothpick inserted into the center comes out clean. Once baked, allow the cakes to cool in the pans for about 10 minutes before transferring them to a wire rack to cool completely.
Step 8: Preparing the Frosting
While the cake layers cool, prepare the frosting. Beat heavy cream, powdered sugar, and softened cream cheese or mascarpone until the mixture becomes smooth, creamy, and spreadable. A touch of cherry syrup can be added to the frosting to give it both flavor and a delicate pastel shade.
Step 9: Assembling the Cake
Place one cake layer on a serving plate or cake board. Spread a layer of frosting evenly on top, followed by a thin layer of cherry preserve if desired. Repeat with the remaining layers. Once stacked, cover the entire cake with a thin coat of frosting (the crumb coat) and chill it for about 20 minutes. After chilling, apply the final coat of frosting, smoothing it as neatly as possible.
Step 10: Decorating the Cake
This cake is called Cherry Blossom Dream Cake for a reason, so take a little time to decorate it beautifully. You can pipe delicate swirls of frosting, add fresh cherries on top, or even place edible blossoms for a soft spring look. A dusting of powdered sugar also works wonderfully to mimic petals.
Quick and Easy
Even though the cake looks elegant, the steps are easy to follow. By preparing the ingredients ahead of time and organizing your tools, the process becomes smooth and enjoyable. Once you’ve made it once, you’ll find yourself preparing it again with even greater ease.
Customizable
The recipe can be adjusted depending on your personal preferences. If you want a stronger cherry flavor, add extra cherry syrup to the batter or frosting. For a lighter version, you can reduce the sugar slightly. You could also experiment with different fillings between the layers, such as a whipped cream filling or even a chocolate ganache. The decoration is also yours to personalize, whether you keep it simple or turn it into a floral masterpiece.
Popular With Many People
The Cherry Blossom Dream Cake never fails to impress. It’s popular with both children and adults thanks to its gentle sweetness and appealing presentation. Whether you serve it at a casual gathering or a formal celebration, it draws attention immediately. Guests often ask for seconds, and many will ask you for the recipe afterward. It is not just a cake; it becomes a highlight of the event.
Print
Cherry Blossom Dream Cake
The Cherry Blossom Dream Cake is a delicate and elegant dessert inspired by the beauty of blooming cherry trees. Soft, moist cake layers are infused with vanilla and almond notes, paired with a creamy frosting and subtle cherry flavor. Perfect for celebrations or a special treat, this cake combines charm, flavor, and simplicity.
- Total Time: 1 hour
- Yield: 12 1x
Ingredients
- 2 ½ cups all-purpose flour
- 2 ½ tsp baking powder
- ½ tsp salt
- 1 cup unsalted butter, softened
- 2 cups granulated sugar
- 4 large eggs
- 1 cup whole milk
- 2 tsp pure vanilla extract
- 1 tsp almond extract
- ¼ cup cherry preserve or cherry syrup
- 1 ½ cups heavy cream
- ¾ cup powdered sugar
- ½ cup cream cheese or mascarpone (optional)
- Pink food coloring (optional)
- Fresh cherries or edible blossoms for decoration
Instructions
- Preheat oven to 175°C (350°F). Grease and flour two or three round cake pans, lining the bottom with parchment paper.
- In a bowl, whisk together flour, baking powder, and salt; set aside.
- Beat butter and sugar until pale and fluffy.
- Add eggs one at a time, beating well after each addition. Stir in vanilla and almond extracts.
- Gradually add the dry ingredients, alternating with milk, starting and ending with dry ingredients. Mix until just combined.
- Fold in cherry preserve and optional pink food coloring for a blush effect.
- Divide batter into prepared pans and smooth tops. Bake 25–30 minutes, or until a toothpick comes out clean. Cool in pans for 10 minutes, then transfer to a wire rack.
- Beat heavy cream, powdered sugar, and cream cheese/mascarpone until smooth and spreadable. Optionally, add cherry syrup for flavor and color.
- Place one cake layer on a serving plate, spread frosting evenly, add cherry preserve if desired, and repeat with remaining layers. Apply a crumb coat and chill for 20 minutes, then apply the final coat of frosting.
- Decorate with piped frosting, fresh cherries, or edible blossoms. Dust with powdered sugar if desired.
Notes
Adjust sweetness according to taste.
For a stronger cherry flavor, add extra cherry syrup to the batter or frosting.
Ensure cake layers are fully cooled before frosting to prevent melting.
- Prep Time: 30
- Cook Time: 30
FAQs
Can I make this cake in advance?
Yes, you can bake the cake layers a day or two in advance and store them tightly wrapped at room temperature. Frost the cake just before serving to maintain freshness and prevent the frosting from drying out.
Can I use frozen cherries instead of cherry preserves?
Absolutely. Thaw the cherries first and lightly mash them to create a spreadable texture. You can also cook them with a little sugar to enhance the flavor before adding between the layers.
Can I substitute the cream cheese frosting?
Yes, you can use whipped cream, buttercream, or mascarpone frosting depending on your preference. Each option works well, though cream cheese frosting adds a subtle tang that complements the cherry flavor.
How do I store leftover cake?
Cover the cake with a cake dome or airtight container and store it in the refrigerator for up to 3 days. Bring it to room temperature before serving for the best texture and flavor.
Can I make this cake gluten-free?
Yes, substitute all-purpose flour with a gluten-free baking blend. Make sure the blend contains xanthan gum for proper texture and structure. Baking times may vary slightly, so keep an eye on the layers.
Can I make mini cakes or cupcakes?
Yes, the batter works well for smaller portions. Adjust baking time depending on size—mini cakes or cupcakes typically take 12–20 minutes in a 175°C (350°F) oven.