

Whenever I think about fall desserts, this Apple Butter Cheesecake immediately comes to mind. I still remember the first time I created it in my kitchen – the aroma of cinnamon, apples, and cream cheese filled the air, and I knew it was going to become a recipe I would make over and over again. Unlike traditional cheesecakes that require baking, this version is completely no-bake, which makes it so approachable and stress-free. It’s smooth, creamy, and perfectly spiced with apple butter that gives it a cozy seasonal flavor.
What I love most about this cheesecake is how effortless it is to prepare compared to baked cheesecakes. There’s no need to worry about water baths, cracks, or long oven times. Instead, you simply assemble, chill, and enjoy. The flavor is rich and comforting while the texture is luxuriously creamy. The crust adds a slight crunch, creating a beautiful contrast in every bite.
Why You Will Love This Recipe
You’ll love this Apple Butter Cheesecake because it offers everything you crave in a dessert without the effort of baking. The apple butter blends seamlessly with cream cheese and whipped topping, creating a smooth filling with a hint of autumn spices. It’s the kind of dessert that impresses guests yet feels simple enough for a casual family treat.
The no-bake method also makes it a reliable option for those busy days when you still want to serve something homemade and special. Every slice tastes like fall wrapped in a creamy bite, making it an instant favorite for holidays, gatherings, or just a sweet weekend indulgence.
Versatile
This cheesecake is wonderfully versatile. You can serve it as a holiday centerpiece, a make-ahead dessert for a dinner party, or even as a treat for a cozy night at home. It pairs beautifully with a warm cup of coffee or spiced tea. You can also customize it by changing the crust base – graham crackers, gingersnaps, or even digestive biscuits work perfectly. For toppings, you can drizzle caramel sauce, sprinkle chopped nuts, or even layer thin apple slices for an extra decorative finish.
Affordable
Another reason this dessert shines is its affordability. Most of the ingredients are pantry staples or easy to find at any grocery store. You won’t need any specialty tools either – just a simple springform pan or pie dish, and you’re ready to go. Compared to purchasing a fancy bakery cheesecake, making this at home saves you money while giving you a fresh, homemade flavor that’s truly unbeatable.
Ingredients for the Recipe
-
Graham cracker crumbs (or gingersnap crumbs)
-
Unsalted butter
-
Cream cheese
-
Powdered sugar
-
Vanilla extract
-
Apple butter
-
Whipped topping (or heavy cream whipped to soft peaks)
How to Prepare Apple Butter Cheesecake {No Bake}
Step-by-Step Instructions for Preparation
Making this Apple Butter Cheesecake is a straightforward process that doesn’t require baking. Each step is simple and easy to follow, which makes the recipe approachable even if you are not an experienced baker.
Step 1: Prepare the Crust
Start by preparing the base of your cheesecake. Crush the graham crackers or gingersnaps into fine crumbs using either a food processor or by placing them in a sealed bag and crushing them with a rolling pin. Place the crumbs into a bowl and mix with melted butter until they resemble damp sand. This mixture should hold together when pressed. Transfer the crumb mixture into a springform pan or pie dish. Press it down firmly and evenly across the bottom to form a compact crust. Place the crust in the refrigerator to chill while you prepare the filling.
Step 2: Mix the Cream Cheese Filling
In a large mixing bowl, beat the softened cream cheese until it becomes smooth and lump-free. Add powdered sugar and vanilla extract, and continue beating until everything is fully combined. This creates the sweet and creamy base for your cheesecake. Next, add apple butter to the cream cheese mixture and beat again until well incorporated. The apple butter will give the filling its spiced autumn flavor and silky texture.
Step 3: Fold in Whipped Topping
Once the apple butter and cream cheese mixture is ready, gently fold in the whipped topping. Be careful not to deflate the whipped topping as you fold – use a spatula and work in slow, steady movements. This step lightens the mixture and creates the smooth, mousse-like consistency that makes this cheesecake so special.
Step 4: Assemble the Cheesecake
Remove the crust from the refrigerator. Spoon the apple butter cheesecake filling onto the prepared crust, spreading it evenly with a spatula. Smooth the top for a clean, polished look. Cover the cheesecake with plastic wrap or foil, then place it in the refrigerator to set. Allow the cheesecake to chill for at least 4 hours, but overnight is best to achieve a firm texture that holds together when sliced.
Step 5: Serve and Enjoy
Once the cheesecake has set, carefully remove it from the pan. Use a sharp knife dipped in warm water for clean slices. At this stage, you can serve the cheesecake as it is or add your favorite toppings. Caramel drizzle, chopped nuts, or extra apple butter spread across the top are wonderful finishing touches.
Quick and Easy
This cheesecake is proof that a show-stopping dessert does not need to take hours of work in the kitchen. The preparation process requires only a handful of steps and can be completed in under 20 minutes. The rest of the time is passive while the cheesecake chills in the refrigerator. Because it doesn’t involve any baking, you eliminate the stress of oven timing, cracks, or sinking middles that are common with traditional cheesecakes.
Customizable
One of the best things about this cheesecake is how customizable it is. You can switch up the crust with graham crackers for a classic taste, gingersnaps for extra spice, or even chocolate cookies for a richer variation. If you prefer a lighter version, you can reduce the amount of powdered sugar or use Greek yogurt in place of part of the cream cheese. The topping options are endless – from drizzled caramel and candied pecans to spiced apples or even a swirl of extra apple butter across the top. This flexibility makes the dessert adaptable to different occasions and preferences.
Popular with Many People
Apple Butter Cheesecake has a universal appeal that makes it popular across all age groups. Children love the creamy texture and sweet flavor, while adults enjoy the spiced apple butter that reminds them of seasonal fall desserts. It is often requested at holiday gatherings because it feels festive without being too heavy. Since it is no-bake, it also works beautifully for warm-weather occasions when you want a refreshing yet indulgent treat. Whether you are hosting Thanksgiving, a family reunion, or just a casual dinner with friends, this cheesecake will always be a crowd-pleaser.
Print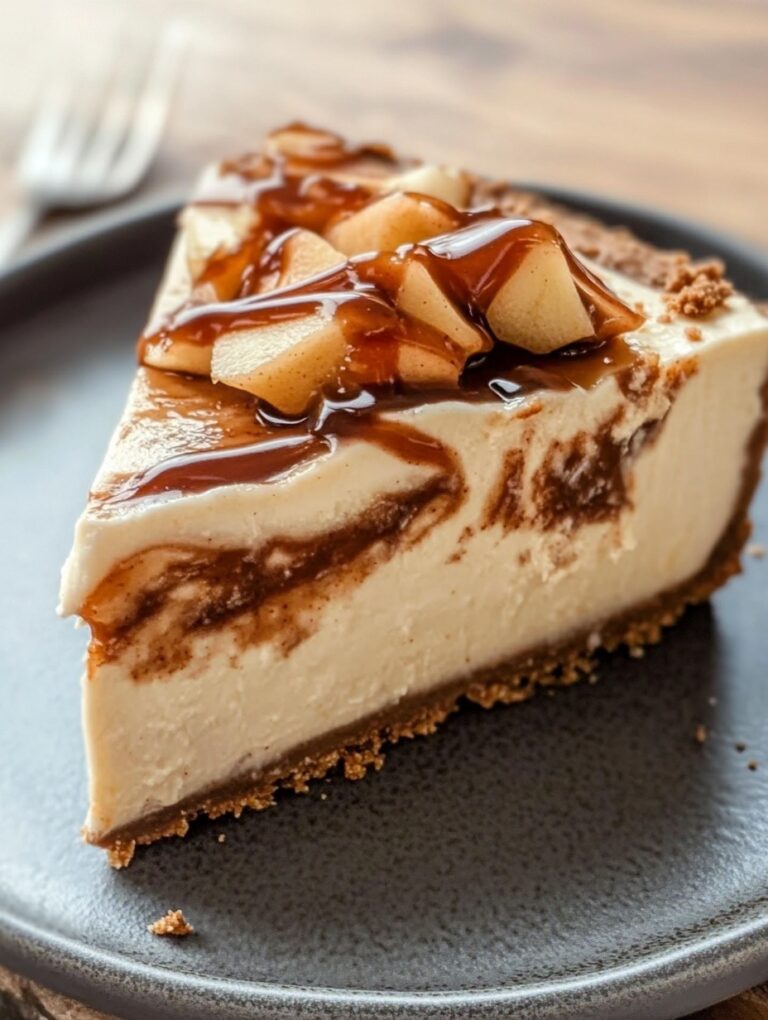
Apple Butter Cheesecake {No Bake}
This no-bake Apple Butter Cheesecake is a simple yet indulgent dessert that combines a buttery crust, creamy spiced filling, and smooth whipped topping. It’s perfect for fall gatherings, holiday celebrations, or a cozy family treat.
- Total Time: 20 minutes
- Yield: 10 1x
Ingredients
For the crust:
- 1 ½ cups graham cracker crumbs (or gingersnap crumbs)
- 5 tablespoons unsalted butter, melted
For the filling:
- 16 oz (450 g) cream cheese, softened
- ¾ cup powdered sugar
- 1 teaspoon vanilla extract
- ¾ cup apple butter
- 1 cup whipped topping (or heavy cream whipped to soft peaks)
Optional toppings:
- Caramel sauce
- Chopped nuts
- Thin apple slices
- Extra apple butter
Instructions
- Prepare the crust: Crush graham crackers or gingersnaps into fine crumbs. Mix with melted butter until the mixture holds together. Press into the bottom of a springform pan or pie dish. Chill while preparing the filling.
- Make the filling: Beat softened cream cheese until smooth. Add powdered sugar and vanilla extract, beating until fully incorporated. Mix in apple butter until uniform.
- Fold in whipped topping: Gently fold whipped topping into the cream cheese mixture until light and airy. Avoid overmixing to maintain the mousse-like texture.
- Assemble the cheesecake: Spread the filling evenly over the chilled crust. Smooth the top with a spatula. Cover with plastic wrap or foil.
- Chill: Refrigerate for at least 4 hours or overnight until set.
- Serve: Remove from the pan, slice with a warm knife for clean edges, and optionally add toppings before serving.
Notes
For best results, use room-temperature cream cheese.
The cheesecake can be made a day ahead to enhance flavors.
Customize the crust and toppings to suit your preference.
- Prep Time: 20
FAQs: Apple Butter Cheesecake {No Bake}
1. Can I make this cheesecake ahead of time?
Yes, this no-bake cheesecake is perfect for making ahead. Prepare and assemble it a day in advance, then chill in the refrigerator. Overnight chilling helps the flavors meld and ensures a firm, sliceable texture.
2. Can I use a different type of crust?
Absolutely! While graham crackers are traditional, gingersnaps or digestive biscuits work beautifully. You can even try chocolate cookies for a richer flavor. Just make sure to combine the crumbs with melted butter to form a firm crust.
3. How long does this cheesecake last?
When stored properly in the refrigerator, this cheesecake stays fresh for up to 4–5 days. Always cover it with plastic wrap or store in an airtight container to prevent it from absorbing other fridge odors.
4. Can I make a smaller or larger cheesecake?
Yes, you can adjust the recipe based on your pan size. Keep the same proportions for filling and crust, and remember that chilling time may vary slightly depending on thickness.
5. Can I freeze this cheesecake?
Yes, you can freeze it. Wrap the cheesecake tightly in plastic wrap and then in aluminum foil. Thaw in the refrigerator overnight before serving. The texture may be slightly different, but it will still taste delicious.
6. Can I use a sugar-free alternative?
You can substitute powdered sugar with a sugar-free equivalent, but ensure it blends smoothly into the cream cheese. Some alternatives may slightly alter the texture, so mix carefully.
7. Can I add extra toppings?
Yes! Caramel drizzle, chopped nuts, thin apple slices, or extra apple butter work perfectly. Adding toppings just before serving keeps them fresh and visually appealing.