
There’s something truly comforting about banana pudding. It brings me back to childhood gatherings, Sunday dinners, and those quiet moments when a sweet treat made everything better. Over the years, I’ve tried dozens of ways to elevate banana pudding, but nothing has ever come close to the magic of combining it with cheesecake. That’s how this Banana Pudding Cheesecake recipe was born – from a desire to blend two timeless desserts into one show-stopping treat.
I remember the first time I served it at a family brunch. People expected either a banana pudding or a cheesecake, but not both. As soon as they took that first bite – creamy, smooth cheesecake with a golden vanilla wafer crust, layered with fresh bananas and topped with whipped cream – I knew it was a hit. Since then, it’s become a favorite at birthdays, potlucks, and even casual dinners.
Why You Will Love This Recipe
This Banana Pudding Cheesecake is a celebration of flavor and texture. You get the rich, creamy consistency of a traditional cheesecake, the nostalgic charm of banana pudding, and a crunchy vanilla wafer base that ties it all together. It’s the kind of dessert that doesn’t just satisfy a sweet tooth – it tells a story, offers comfort, and impresses guests all at once.
Not only is it indulgent, but it’s also surprisingly simple to prepare. The recipe is straightforward, with no fancy tools or complex techniques required. Whether you’re an experienced baker or someone just starting in the kitchen, this recipe will guide you step by step with ease.
Versatile
One of the best things about this cheesecake is how versatile it is. You can serve it chilled on a warm day or slightly warmed in cooler weather. It’s perfect as a make-ahead dessert and works beautifully with different toppings like caramel drizzle, extra banana slices, or a dusting of cinnamon. Want to turn it into mini cheesecakes for individual servings? That’s easily done. You can even experiment with the crust – try graham crackers, shortbread cookies, or gluten-free alternatives based on your needs.
Affordable
This dessert also checks the box for affordability. Most of the ingredients are pantry staples – cream cheese, bananas, sugar, eggs, vanilla, and vanilla wafers. You won’t need to break the bank or hunt for exotic items. It’s a great option when you want to serve something impressive without spending a lot.
Ingredients for the Recipe
-
Cream cheese (softened)
-
Granulated sugar
-
Eggs
-
Vanilla extract
-
Ripe bananas
-
Sour cream or Greek yogurt
-
All-purpose flour (optional, for thickening)
-
Vanilla wafer cookies (for the crust and layering)
-
Unsalted butter (melted)
-
Whipped cream (for topping)
-
Instant banana pudding mix (optional, for added flavor)
-
Milk (if using pudding mix)
-
Lemon juice (to prevent banana browning)
How to Prepare This Recipe
This Banana Pudding Cheesecake comes together in several easy steps. It may look elegant and taste indulgent, but the process is simple, stress-free, and manageable for any home baker. From the buttery vanilla wafer crust to the creamy banana-infused filling and final whipped topping, every element builds on the next to create something truly special.
Step-by-Step Instructions for Preparation
1. Prepare the Crust
Start by crushing the vanilla wafer cookies until they’re fine crumbs. You can use a food processor for speed or crush them in a zip-top bag with a rolling pin. Combine the crumbs with melted butter in a bowl and mix until the texture resembles wet sand.
Press the mixture evenly into the bottom of a springform pan, making sure it’s firm and level. Bake the crust at 175°C (350°F) for about 8–10 minutes. This gives it a slight crunch and helps it hold together when the cheesecake is sliced. Let the crust cool while you prepare the filling.
2. Make the Cheesecake Filling
In a large mixing bowl, beat the softened cream cheese until smooth and free of lumps. Add the sugar and continue beating until fully incorporated. Next, mix in the eggs one at a time, ensuring each egg is completely blended before adding the next. Stir in the vanilla extract and a small amount of lemon juice to brighten the banana flavor.
Mash the ripe bananas in a separate bowl, then fold them into the cream cheese mixture. Add sour cream (or Greek yogurt) to enhance the creaminess and balance the sweetness. If the filling seems too loose, you can add a tablespoon of flour to help it firm up during baking.
3. Assemble the Cheesecake
Pour half of the cheesecake filling over the cooled crust. Arrange a single layer of vanilla wafers on top, followed by a layer of banana slices. Pour the remaining filling on top and smooth the surface with a spatula.
To prevent cracks, place a pan of hot water on the lower oven rack while baking the cheesecake in the center of the oven. Bake at 160°C (325°F) for about 55–65 minutes, or until the center is just set and the edges are slightly puffed. Do not open the oven during baking.
Once baked, turn off the oven and leave the cheesecake inside with the door slightly ajar for 30 minutes. Then, remove it and allow it to cool completely at room temperature. Cover and refrigerate for at least 4 hours or overnight for best results.
4. Prepare the Topping
If desired, prepare instant banana pudding according to the package instructions using cold milk. Spread a thin layer of pudding over the chilled cheesecake before adding the whipped topping. Otherwise, you can skip the pudding and go straight to decorating with whipped cream.
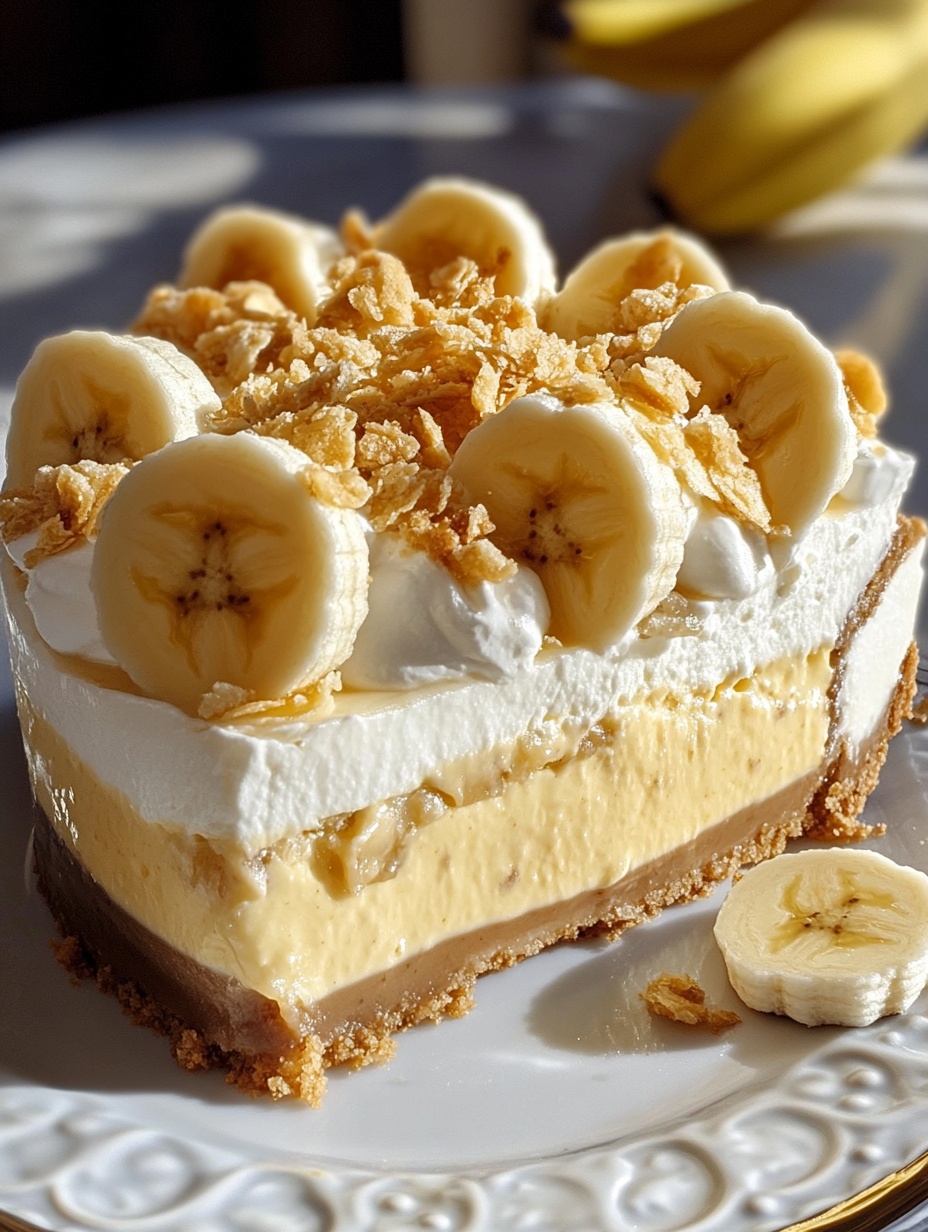
Top with piped whipped cream, banana slices, and crushed vanilla wafers. For a more decorative look, use whole wafers along the outer edge or sprinkle cinnamon for a hint of warmth.
Quick and Easy
What makes this recipe especially easy is the minimal prep work. You don’t need a water bath, fancy mixers, or elaborate garnishes. Most of the effort is in the initial mixing and layering – after that, the oven does the rest. The no-fuss method makes this cheesecake perfect for busy days or when you’re baking for a crowd.
Customizable
You can customize the texture and flavor easily. Want it a little sweeter? Add more sugar. Need a firmer texture? Use more sour cream or a spoonful of cornstarch. Prefer a stronger banana flavor? Add a few teaspoons of banana extract. You can even make it gluten-free by using certified gluten-free vanilla wafers.
Don’t like whipped cream? Top with a thin cream cheese frosting. Want a bolder presentation? Drizzle caramel or chocolate sauce before serving. This cheesecake adapts to your style and taste preferences with very little adjustment needed.
Popular With Many People
Everyone loves banana pudding. Everyone loves cheesecake. This recipe combines the best of both, making it an instant favorite at any event. Whether you’re serving children, adults, or picky eaters, this dessert satisfies all palates. It brings out nostalgic memories while delivering the creamy richness that makes cheesecake so beloved.
With its comforting flavors and impressive appearance, this Banana Pudding Cheesecake will quickly become your go-to dessert for special occasions and weekend treats alike.
Print
Banana Pudding Cheesecake
This Banana Pudding Cheesecake brings together the classic charm of banana pudding and the creamy indulgence of cheesecake in one irresistible dessert. With a buttery vanilla wafer crust, a rich banana-infused filling, and a dreamy whipped topping, it’s a crowd-pleasing treat perfect for any occasion.
- Total Time: 1 hour 25 minutes
- Yield: 12 1x
Ingredients
For the Crust:
- 2 cups vanilla wafer cookie crumbs
- 6 tablespoons unsalted butter, melted
For the Cheesecake Filling:
- 24 oz cream cheese, softened
- 1 cup granulated sugar
- 3 large eggs
- 1 teaspoon vanilla extract
- 2 medium ripe bananas, mashed
- 1 tablespoon lemon juice
- 1 cup sour cream (or plain Greek yogurt)
- 1 tablespoon all-purpose flour (optional, for thickening)
For the Layering (optional):
- 1 cup vanilla wafer cookies
- 1 banana, sliced
For the Topping:
- 1 cup whipped cream (homemade or store-bought)
- Crushed vanilla wafers
- Additional banana slices
- Optional: 1 package instant banana pudding + 1½ cups milk
Instructions
- Step 1 – Prepare the Crust:
Preheat the oven to 175°C (350°F). Crush vanilla wafers into fine crumbs. Combine with melted butter until well mixed. Press the mixture into the bottom of a greased 9-inch springform pan. Bake for 8–10 minutes. Let cool. - Step 2 – Make the Filling:
In a large bowl, beat cream cheese until smooth. Add sugar and beat until creamy. Mix in eggs one at a time, then stir in vanilla and lemon juice. Fold in mashed bananas and sour cream. Add flour if needed for firmness. - Step 3 – Assemble:
Pour half the filling over the crust. Add a layer of banana slices and whole vanilla wafers. Pour the remaining filling on top and smooth it out. - Step 4 – Bake:
Place a pan of hot water on the lower oven rack. Bake the cheesecake at 160°C (325°F) for 55–65 minutes, until the edges are set and the center is slightly jiggly. Turn off oven and let cheesecake cool inside with door slightly open for 30 minutes. Then cool completely at room temperature. - Step 5 – Chill:
Cover and refrigerate for at least 4 hours or overnight. - Step 6 – Add Topping:
If using banana pudding, prepare it with milk and spread a thin layer on top of the chilled cheesecake. Pipe whipped cream over it, then decorate with banana slices and crushed wafers.
Notes
For a firmer texture, add 1 tablespoon of flour to the batter.
To prevent browning, dip banana slices in lemon juice before layering or topping.
Always chill the cheesecake fully before slicing to get clean cuts.
This recipe works with graham crackers or shortbread cookies if vanilla wafers are unavailable.
- Prep Time: 25
- Cook Time: 60
FAQs
Can I use fresh bananas instead of banana pudding mix?
Yes, absolutely. This recipe relies primarily on ripe, mashed bananas for natural flavor. However, adding banana pudding mix is optional if you want to intensify the banana taste. If you’re using only fresh bananas, make sure they are very ripe for maximum sweetness and richness.
Can I make this cheesecake ahead of time?
Yes, in fact, it’s best made ahead. Banana Pudding Cheesecake needs to chill for several hours or overnight to firm up and develop full flavor. You can make it up to 2 days in advance and store it in the refrigerator until you’re ready to serve.
How do I prevent my cheesecake from cracking?
To prevent cracking, avoid overmixing the batter once the eggs are added. Also, bake the cheesecake in a low, even heat, and cool it gradually. A hot water pan placed in the oven while baking can help maintain moisture. After baking, let it cool inside the oven with the door slightly open.
Can I freeze Banana Pudding Cheesecake?
Yes, it freezes well. Wrap the cooled, undecorated cheesecake tightly in plastic wrap and foil, then freeze for up to 1 month. Thaw it in the refrigerator overnight before serving. Add toppings only after thawing.
What can I use instead of vanilla wafers?
You can substitute vanilla wafers with graham crackers, shortbread cookies, or even digestive biscuits. Choose a cookie that complements banana flavor and can be crushed into a firm crust.
Can I make this recipe without a springform pan?
Yes, although a springform pan makes it easier to remove the cheesecake cleanly. If using a regular baking dish, line it with parchment paper for easier lifting and slicing.
Can I turn this into mini cheesecakes?
Absolutely. Use a muffin tin with liners and reduce the baking time to around 20–25 minutes. They make great individual desserts for parties or gatherings.