
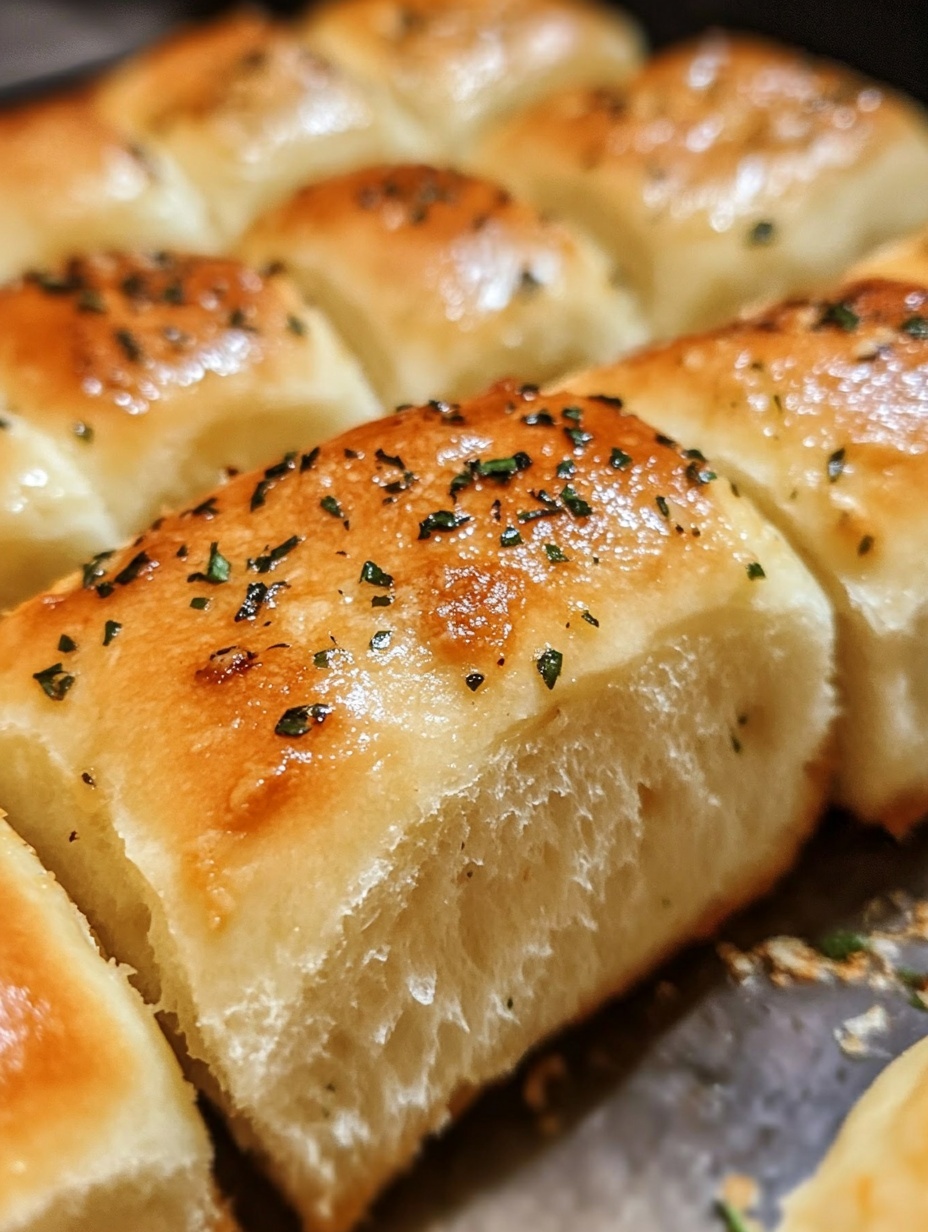
I still remember the first time I baked garlic bread rolls in my kitchen. The warm aroma of garlic and butter spread through the air, making my entire home smell like a cozy bakery. Since then, this recipe has become one of my favorite creations to share. I enjoy preparing these rolls not only for myself but also for friends and family. Every bite is soft, buttery, and full of flavor, which makes it impossible to resist reaching for another.
You will love this recipe because it is simple, quick, and filled with classic flavors. The combination of fresh garlic, melted butter, and soft bread creates a comfort food that feels indulgent yet approachable. Each roll is perfectly golden on the outside and pillowy soft on the inside, offering a satisfying texture that pairs well with nearly any meal. Whether you want to serve them at a family dinner, as a snack, or alongside soup or pasta, these garlic bread rolls will always be a hit.
Another reason this recipe is so appealing is its versatility. You can enjoy the rolls fresh out of the oven, stuffed with cheese for extra richness, or paired with a dipping sauce for variety. They can even be shaped differently depending on the occasion. Their flavor blends well with countless dishes, making them an adaptable option for everyday meals or special gatherings.
Affordability is another advantage. The ingredients used are simple, budget-friendly, and often already available in the pantry. Flour, yeast, butter, garlic, and milk are all everyday items, which means you can prepare this recipe without making a special trip to the store. This makes it an economical choice for families who want to enjoy homemade bread without overspending.
Every ingredient plays an important role in creating the perfect garlic bread rolls. Flour gives the structure and body. Yeast helps the dough rise and keeps the rolls light and fluffy. Milk makes the bread softer and adds a subtle richness. Garlic is, of course, the star of the recipe, bringing its unmistakable flavor. Butter enhances the taste and gives the rolls their irresistible golden crust. Salt balances everything, while a touch of sugar activates the yeast and improves the overall flavor. Fresh parsley or herbs can be added for extra aroma and freshness.
These easy garlic bread rolls are the perfect balance of flavor, texture, and simplicity. Once you try them, they will quickly become a staple in your kitchen.
How to Prepare This Recipe
Baking garlic bread rolls at home is an enjoyable process that rewards you with soft, flavorful rolls fresh from the oven. The method is straightforward, yet it produces professional results. By following these steps carefully, you will create golden rolls with a rich garlic aroma that will delight everyone around your table.
Step-by-Step Instructions for Preparation
Step 1: Activate the yeast
Start by warming some milk until it is slightly warm but not hot. Pour it into a mixing bowl and add sugar and active dry yeast. Stir gently and let the mixture rest for about 5 to 10 minutes. During this time, the yeast will activate, creating a foamy layer on the surface. This step ensures the dough will rise properly and develop a light, airy texture.
Step 2: Mix the dough
Once the yeast is ready, add flour, a pinch of salt, and softened butter to the bowl. Mix until the ingredients come together into a rough dough. Transfer the dough onto a lightly floured surface and knead it for about 8 to 10 minutes. The dough should become smooth, elastic, and slightly tacky but not sticky. Kneading helps develop the gluten, which gives the bread structure and softness.
Step 3: First rise
Place the kneaded dough into a lightly greased bowl, cover it with a clean kitchen towel, and let it rest in a warm place for about one hour. During this time, the dough will double in size. This first rise is essential because it builds the foundation for the fluffy texture of the bread rolls.
Step 4: Prepare the garlic butter mixture
While the dough rises, prepare the garlic butter. Melt butter in a small saucepan and add finely minced garlic. Cook gently until the garlic becomes fragrant without browning. Stir in chopped parsley or herbs for added freshness and flavor. Set this mixture aside to cool slightly before using it on the dough.
Step 5: Shape the rolls
Once the dough has doubled in size, punch it down gently to release excess air. Divide the dough into equal portions, usually about 10 to 12 pieces, depending on your preference. Roll each piece into a smooth ball. Arrange the balls onto a greased or parchment-lined baking tray, leaving space between them for expansion. Brush the tops with a light layer of the prepared garlic butter mixture.
Step 6: Second rise
Cover the tray loosely with a towel and let the rolls rise again for 30 to 40 minutes. During this time, the dough balls will puff up, becoming soft and pillowy. This second rise ensures the bread has a tender crumb and an even shape once baked.
Step 7: Bake the rolls
Preheat your oven to 180°C (350°F). Once the rolls have finished rising, place the tray in the oven and bake for 18 to 22 minutes. The rolls should turn golden brown on top while remaining soft inside. To check doneness, tap lightly on one roll; it should sound hollow.
Step 8: Add the final touch
Remove the rolls from the oven and immediately brush them with the remaining garlic butter mixture. This step enhances the flavor and gives the bread a glossy finish. Serve warm to enjoy the full aroma of the garlic and butter.
Quick and Easy
Although bread baking often seems complicated, this recipe simplifies the process without sacrificing quality. The steps are easy to follow, and the dough comes together quickly with basic pantry ingredients. From mixing to baking, the method is designed to be accessible even for beginners.
Customizable
One of the greatest strengths of this recipe is how adaptable it can be. You may add grated cheese on top for a richer flavor, incorporate dried herbs into the dough for variety, or sprinkle sesame seeds before baking for texture. You can also shape the dough into knots, twists, or pull-apart rolls depending on the occasion. Each version offers a unique look while keeping the same delicious taste.
Popular with Many People
Garlic bread rolls are universally loved. They appeal to children, adults, and even picky eaters. They pair well with a wide range of dishes, from hearty pasta dinners to light soups or salads. Their inviting aroma often makes them the highlight of the meal, and they rarely last long on the table. This popularity makes them a reliable choice whenever you want to impress guests or simply enjoy a comforting homemade snack.
Print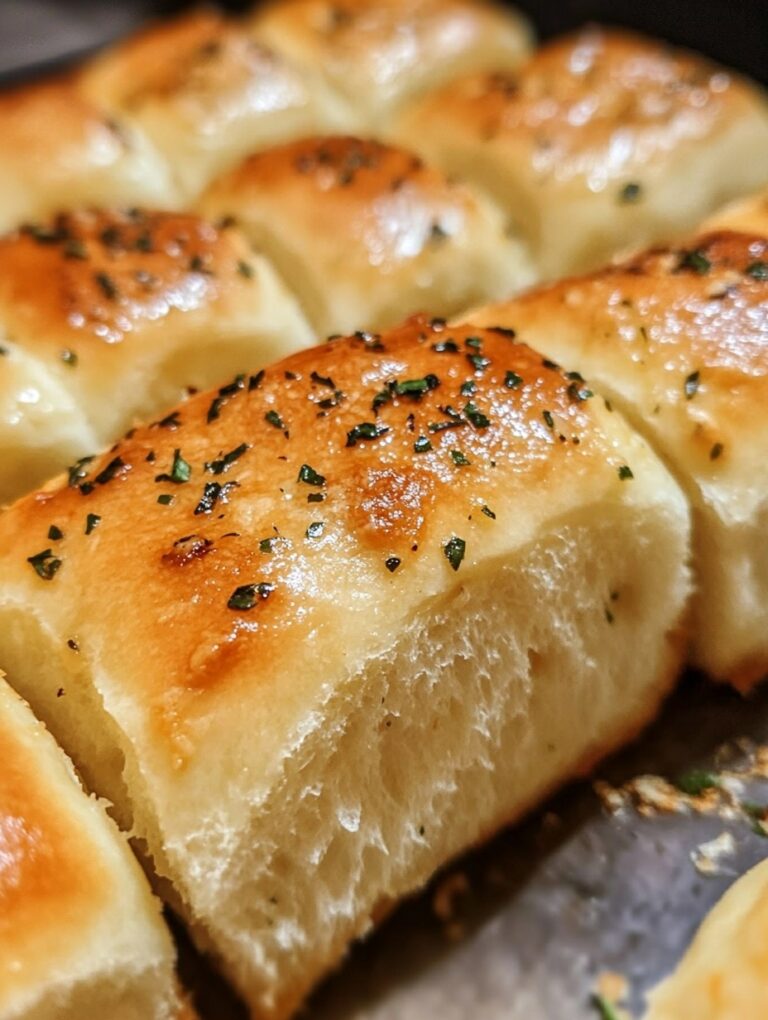
Easy Garlic Bread Rolls Recipe | Yummy Kitchen Baking
These easy garlic bread rolls are soft, fluffy, and filled with rich garlic butter flavor. They are simple to prepare, budget-friendly, and perfect for pairing with pasta, soup, or as a comforting snack.
- Total Time: 40 minutes
- Yield: 12 1x
Ingredients
- 3 ½ cups all-purpose flour
- 2 ¼ teaspoons active dry yeast
- 1 cup warm milk
- 2 tablespoons sugar
- 1 teaspoon salt
- 3 tablespoons softened butter
- 4 tablespoons melted butter (for garlic mixture)
- 4 cloves garlic, finely minced
- 2 tablespoons fresh parsley, chopped
Instructions
- Warm the milk until it is slightly warm but not hot. Add sugar and active dry yeast, stir, and let rest for 5–10 minutes until foamy.
- Add flour, salt, and softened butter to the yeast mixture. Mix until a dough forms.
- Transfer the dough to a floured surface and knead for 8–10 minutes until smooth and elastic.
- Place the dough in a greased bowl, cover with a towel, and let rise in a warm spot for 1 hour, or until doubled in size.
- While waiting, prepare the garlic butter: melt butter in a pan, add minced garlic, and cook gently until fragrant. Stir in chopped parsley, then set aside to cool slightly.
- Punch down the risen dough and divide it into 10–12 equal portions. Roll each portion into a ball.
- Arrange the dough balls on a greased or parchment-lined tray, leaving space between them. Brush lightly with garlic butter.
- Cover and let the rolls rise for another 30–40 minutes until puffy.
- Preheat the oven to 180°C (350°F). Bake the rolls for 18–22 minutes, or until golden brown and hollow-sounding when tapped.
- Remove from the oven and brush immediately with the remaining garlic butter for a glossy finish. Serve warm.
Notes
Use fresh garlic for the best flavor.
Kneading properly is essential for soft, fluffy rolls.
Rolls can be frozen after baking and reheated when needed.
- Prep Time: 20
- Cook Time: 20
FAQs
Can I use instant yeast instead of active dry yeast?
Yes, you can replace active dry yeast with instant yeast. If you do so, you can mix it directly with the flour without activating it first. However, you should still ensure your liquid ingredients are warm, not hot, to help the dough rise effectively.
How do I store leftover garlic bread rolls?
Once baked, allow the rolls to cool completely. Store them in an airtight container at room temperature for up to two days. For longer storage, place them in a freezer-safe bag and freeze. When ready to eat, reheat them in the oven for a few minutes until warm.
Can I make the dough ahead of time?
Yes, you can prepare the dough in advance. After the first rise, cover the dough tightly and refrigerate it overnight. The next day, allow it to come to room temperature, shape the rolls, let them rise again, and then bake as directed.
What can I serve with garlic bread rolls?
They pair wonderfully with pasta, soup, or salad. You can also serve them as a side dish for grilled meats or simply enjoy them on their own with a dipping sauce such as marinara or garlic-infused olive oil.
Why are my rolls dense instead of fluffy?
Dense rolls are usually the result of not kneading long enough, using expired yeast, or skipping one of the rising times. To achieve fluffy rolls, follow the instructions carefully and allow enough time for the yeast to work.