
Ever since I first discovered the joy of a perfectly baked blooming onion, I knew this recipe had to become a staple in my kitchen. There’s something incredibly satisfying about transforming a simple onion into a spectacular centerpiece that is both crispy on the outside and tender on the inside. I still remember the first time I made it for a small gathering—guests couldn’t stop reaching for the petals, dipping them in the creamy sauce, and asking for seconds. Baking the onion instead of frying it not only makes it lighter and healthier, but it also locks in the natural sweetness, creating an irresistible flavor that everyone enjoys.
You will love this recipe because it combines impressive presentation with approachable cooking techniques. The onion “blooms” as it bakes, creating layers of crispy, flavorful petals that are perfect for dipping. It’s versatile enough to serve as an appetizer at a dinner party, a fun snack for movie night, or even as a side dish for a casual meal. The crispy coating pairs beautifully with a variety of dips, from tangy yogurt-based sauces to classic garlic aioli, allowing you to customize it to your taste.
Another reason this recipe is so appealing is its affordability. All you need is a large onion, a few pantry staples, and common spices to achieve a stunning, flavorful dish. There’s no need for expensive ingredients or specialty equipment, making it accessible for any home cook.
Ingredients for the Recipe:
-
1 large onion (preferably sweet onion)
-
1 cup all-purpose flour
-
1 teaspoon paprika
-
1 teaspoon garlic powder
-
1 teaspoon onion powder
-
½ teaspoon salt
-
½ teaspoon black pepper
-
½ teaspoon cayenne pepper (optional, for a little heat)
-
2 eggs
-
½ cup milk
-
1–2 cups breadcrumbs (panko works best for extra crunch)
-
Cooking spray or a light drizzle of olive oil
This baked blooming onion is more than just a dish—it’s an experience. From the first cut to the final dip, it brings a sense of fun and satisfaction to the table. Baking instead of frying ensures a healthier result while keeping every petal crisp and flavorful. Once you try it, this recipe will quickly become a favorite for gatherings, family meals, or even a treat just for yourself.
How to Prepare This Recipe
Baking a blooming onion may seem intimidating at first, but with the right steps, it becomes a fun and rewarding process. This recipe is designed to be quick, easy, and customizable while producing a crowd-pleasing dish every time.
Step-by-Step Instructions for Preparation
-
Preheat the Oven: Start by preheating your oven to 400°F (200°C). Line a baking sheet with parchment paper or lightly grease it with olive oil to prevent sticking. This ensures your onion bakes evenly and crisps beautifully.
-
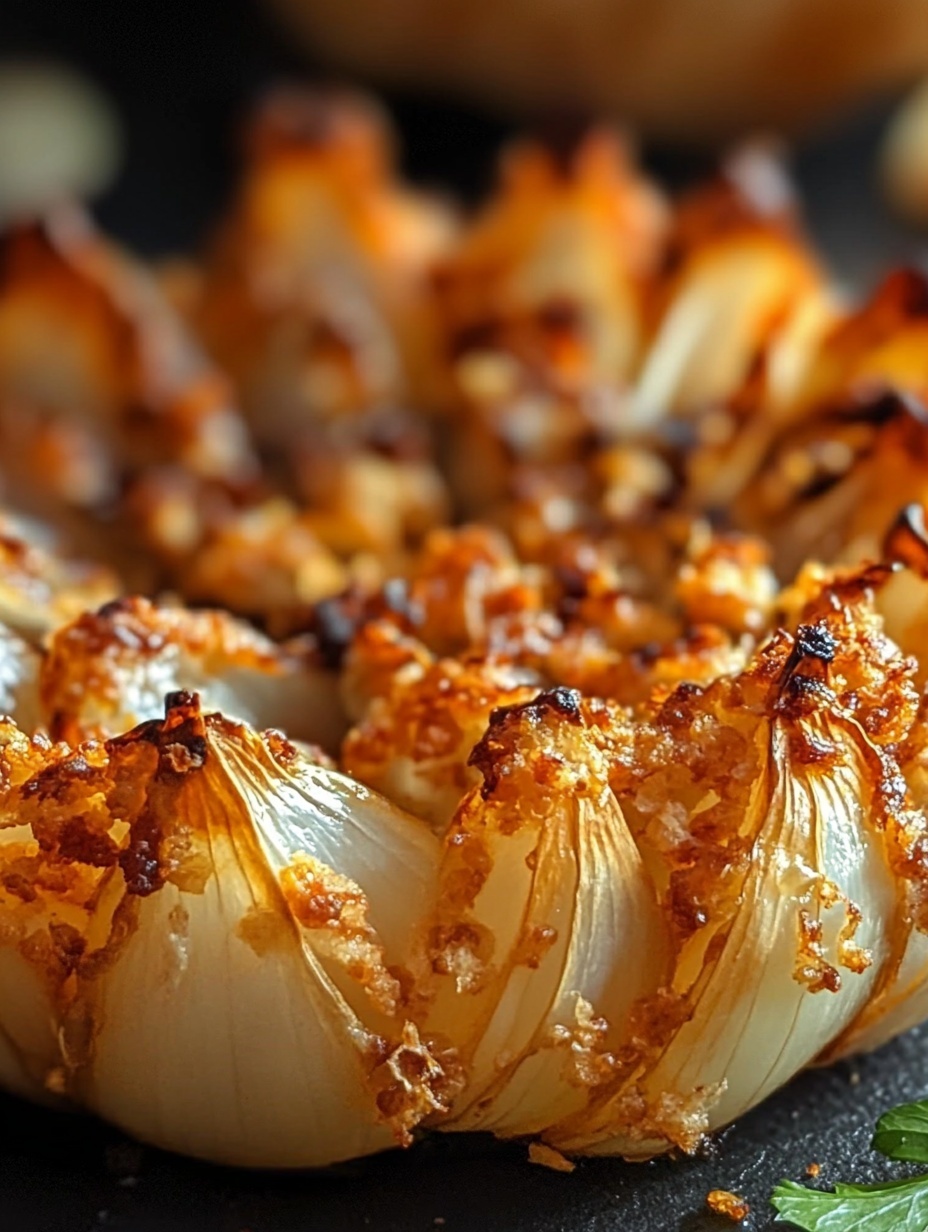
Prepare the Onion: Peel the onion and trim the stem end slightly, making sure not to cut too much so the layers stay intact. Turn the onion upside down, and using a sharp knife, make vertical cuts from the top toward the base. Cut about 12–16 evenly spaced slices, leaving the root intact. Gently separate the layers to form the “blooming” shape.
-
Mix the Coating: In a shallow bowl, combine flour, paprika, garlic powder, onion powder, salt, black pepper, and cayenne pepper if using. In a separate bowl, whisk together eggs and milk until smooth. In a third bowl, place the breadcrumbs.
-
Coat the Onion: Start by dipping the onion into the flour mixture, making sure to get flour between each petal. Next, dip it into the egg mixture, then press it into the breadcrumbs until fully coated. For extra crunch, repeat the egg and breadcrumb step once more.
-
Bake the Onion: Place the coated onion on the prepared baking sheet. Lightly spray or drizzle the top with olive oil to help it crisp. Bake in the preheated oven for 35–45 minutes, or until the petals are golden brown and crispy. Check halfway through, and if needed, rotate the baking sheet for even cooking.
-
Prepare the Dip: While the onion is baking, make a simple dipping sauce. Mix ½ cup Greek yogurt or mayonnaise with 1 teaspoon garlic powder, 1 teaspoon paprika, a pinch of salt, and a squeeze of lemon juice. Adjust seasoning to taste.
-
Serve: Once the onion is baked, allow it to cool slightly, then transfer to a serving platter. Serve warm with the prepared dipping sauce on the side.
Quick and Easy Tips
-
Using panko breadcrumbs creates a crunchier texture compared to regular breadcrumbs.
-
You can bake smaller onions individually for quicker cooking.
-
Preparing the coating in advance allows for a faster assembly on baking day.
Customizable Options
-
Add grated Parmesan cheese to the breadcrumb mixture for a cheesy twist.
-
Sprinkle smoked paprika or chili powder for a smoky, spicy flavor.
-
Serve with a variety of dips, such as ranch, honey mustard, or garlic aioli, to suit every taste.
Popular with Many People
This baked blooming onion is universally loved because it looks impressive and tastes incredible without the heaviness of frying. Kids and adults alike enjoy pulling apart the petals, dipping them in sauce, and savoring the combination of crispy coating and tender onion. It’s perfect for parties, family dinners, or a special appetizer anytime you want to impress.
Print
The best baked Blooming Onions
This baked blooming onion is a show-stopping appetizer that is both crispy and tender. By baking instead of frying, it stays lighter while delivering a satisfying crunch. Perfect for parties, family dinners, or casual snacks, it pairs wonderfully with a variety of dips and is fully customizable to your taste.
- Total Time: 1 hour
- Yield: 6 1x
Ingredients
- 1 large sweet onion
- 1 cup all-purpose flour
- 1 teaspoon paprika
- 1 teaspoon garlic powder
- 1 teaspoon onion powder
- ½ teaspoon salt
- ½ teaspoon black pepper
- ½ teaspoon cayenne pepper (optional)
- 2 eggs
- ½ cup milk
- 1–2 cups breadcrumbs (panko preferred)
- Cooking spray or olive oil
- Dipping sauce: ½ cup Greek yogurt or mayonnaise, 1 teaspoon garlic powder, 1 teaspoon paprika, pinch of salt, squeeze of lemon juice
Instructions
- Preheat oven to 400°F (200°C) and prepare a baking sheet with parchment paper or light oil.
- Peel the onion and trim the stem slightly, keeping the root intact.
- Place onion upside down and cut vertically 12–16 times to create petals. Gently separate layers.
- In a shallow bowl, combine flour, paprika, garlic powder, onion powder, salt, black pepper, and cayenne.
- In a separate bowl, whisk eggs with milk.
- Place breadcrumbs in a third bowl.
- Dip onion first into flour mixture, coating petals thoroughly.
- Dip onion into egg mixture.
- Press into breadcrumbs until fully coated. Repeat egg and breadcrumb step for extra crunch if desired.
- Place onion on baking sheet, lightly spray or drizzle with olive oil.
- Bake for 35–45 minutes until golden brown, rotating halfway through for even cooking.
- While baking, prepare dipping sauce by mixing Greek yogurt or mayonnaise with garlic powder, paprika, salt, and lemon juice.
- Allow onion to cool slightly before serving. Serve with prepared dipping sauce.
Notes
Sweet onions create the best balance of flavor and tenderness.
Panko breadcrumbs ensure a crisp coating.
The dipping sauce can be customized with herbs, spices, or a touch of heat.
- Prep Time: 15
- Cook Time: 45
FAQs
1. Can I use a different type of onion?
Yes, you can use yellow or white onions, but sweet onions like Vidalia work best because they have a milder flavor and slightly higher natural sugar content, which caramelizes nicely during baking.
2. How do I make the onion extra crispy?
For extra crispiness, use panko breadcrumbs and make sure to lightly spray or drizzle olive oil over the coated onion before baking. You can also double-coat it with the egg and breadcrumb mixture.
3. Can I prepare this ahead of time?
You can assemble the onion and coat it in advance, then refrigerate for a few hours. Bake it just before serving to maintain crispiness.
4. Can this recipe be made gluten-free?
Yes, substitute the all-purpose flour with a gluten-free flour blend and use gluten-free breadcrumbs. The baking method remains the same.
5. How do I store leftovers?
Store any leftover baked onion in an airtight container in the refrigerator for up to 2 days. Reheat in the oven at 350°F (175°C) for 5–10 minutes to restore some crispiness.
6. Can I make it spicy?
Absolutely! Add cayenne pepper, chili powder, or smoked paprika to the flour mixture to give the onion a spicy kick.
7. What dips pair well with a baked blooming onion?
Classic options include garlic aioli, ranch dressing, or a yogurt-based dip. You can also experiment with honey mustard or a tangy herb dip for added variety.