
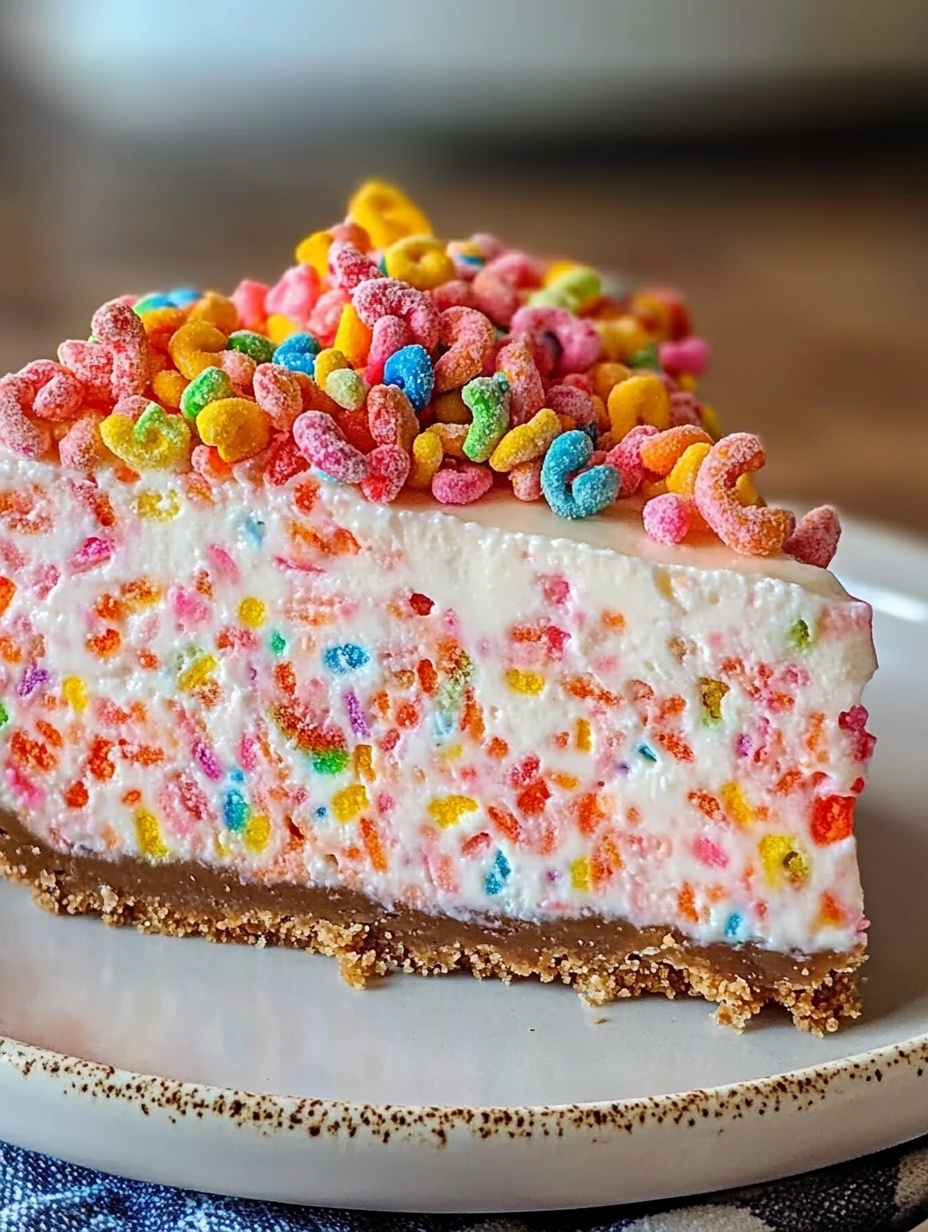
There’s something about nostalgic cereals that takes me straight back to childhood, and Fruity Pebbles is no exception. That’s why I decided to create this vibrant, playful, and delicious No-Bake Fruity Pebbles Cheesecake – a dessert that brings joy to both kids and adults alike. The inspiration came on a sunny afternoon while flipping through my pantry, looking for something simple, cheerful, and unique. I spotted the colorful box of Fruity Pebbles and knew instantly that it had to be transformed into a no-bake cheesecake.
What I love most about this recipe is its fun twist on a classic favorite. The crunchy, rainbow-colored cereal creates a whimsical crust that pairs perfectly with the creamy, smooth cheesecake filling. It’s not just a treat for the taste buds – it’s a feast for the eyes as well. The bold colors make it ideal for birthdays, celebrations, or any time you want to add a splash of happiness to your table.
You’ll absolutely love this No-Bake Fruity Pebbles Cheesecake because it’s:
– Quick and fuss-free: No oven required, no baking time, and no complicated tools.
– Kid-friendly and party-perfect: Loved by children and grown-ups alike. It’s perfect for birthdays, potlucks, or weekend treats.
– Creamy and dreamy: The smooth cheesecake layer complements the sweet crunch of the cereal crust.
– No need to heat up the kitchen: Perfect for summer when you want a dessert without turning on the oven.
Versatile
What’s fantastic is how customizable this recipe is. You can easily adapt it to your taste. Want to add fresh fruit on top? Go for it. Prefer to use another type of cereal for the base? It still works wonderfully. This cheesecake gives you the freedom to play around without fear of messing it up.
Affordable
Another highlight is how budget-friendly it is. You don’t need fancy ingredients or specialty tools – just a few basics from your pantry or local supermarket. It’s the kind of dessert that looks impressive but is surprisingly inexpensive to make.
Ingredients for the Recipe
-
3 cups Fruity Pebbles cereal
-
6 tablespoons unsalted butter, melted
-
2 tablespoons granulated sugar
-
16 oz (450 g) cream cheese, softened
-
1 cup powdered sugar
-
1 teaspoon vanilla extract
-
1½ cups heavy whipping cream
-
Optional: extra Fruity Pebbles for topping
How to Prepare This No-Bake Fruity Pebbles Cheesecake
Making this cheesecake is delightfully simple and requires no baking skills, which makes it perfect for both beginners and busy bakers like me. The key is to follow each step carefully, allowing the cheesecake to set properly in the refrigerator so it achieves the perfect creamy texture.
Step-by-Step Instructions for Preparation
-
Prepare the crust:
Start by crushing the Fruity Pebbles cereal lightly. You want to break them down just enough so they stick together, but not so much that you lose all the crunchy texture. Place the cereal in a large mixing bowl. -
Mix the crust ingredients:
Add the melted unsalted butter and granulated sugar to the crushed cereal. Stir gently but thoroughly until every piece is coated with the butter and sugar mixture. This will help the crust hold together once it’s pressed into the pan. -
Press the crust:
Transfer the mixture to a 9-inch springform pan or a pie dish. Using the back of a spoon or your hands, press the mixture firmly and evenly into the bottom of the pan. Make sure the crust is compact, so it doesn’t crumble when slicing. -
Chill the crust:
Place the crust in the refrigerator for about 15 minutes to firm up while you prepare the filling. -
Prepare the cheesecake filling:
In a large bowl, beat the softened cream cheese until smooth and creamy. It’s important to remove all lumps for the best texture. -
Add powdered sugar and vanilla:
Gradually add the powdered sugar and vanilla extract to the cream cheese, continuing to beat until well combined and fluffy. -
Whip the heavy cream:
In a separate bowl, whip the heavy whipping cream until stiff peaks form. This means when you lift the whisk, the cream holds its shape firmly without collapsing. -
Fold whipped cream into cream cheese mixture:
Gently fold the whipped cream into the cream cheese mixture in batches. Use a spatula to combine them carefully, preserving the light and airy texture. This step is crucial for that creamy, dreamy cheesecake consistency. -
Assemble the cheesecake:
Pour the cheesecake filling over the chilled Fruity Pebbles crust. Use a spatula to spread the filling evenly across the crust. Smooth the top carefully. -
Chill to set:
Cover the pan with plastic wrap and refrigerate for at least 4 hours, preferably overnight. This gives the cheesecake enough time to firm up so it can be sliced cleanly. -
Add toppings and serve:
Just before serving, sprinkle extra Fruity Pebbles cereal on top for added crunch and color. Slice and enjoy your colorful, no-bake treat!
Quick and Easy
This recipe is designed to be straightforward and efficient. With no baking involved, the total hands-on time is under 20 minutes. It’s perfect when you want a show-stopping dessert with minimal effort.
Customizable
You can customize this cheesecake easily. Try swapping the Fruity Pebbles with other cereals like Cocoa Pebbles, Rice Krispies, or even crushed cookies for a different twist. You can also add fresh berries or drizzle with chocolate sauce for extra flavor.
Popular With Many People
This cheesecake has proven to be a crowd-pleaser at parties and family gatherings. Kids especially love the bright colors and the sweet crunch. Adults appreciate how light and creamy it feels compared to traditional baked cheesecakes. It’s truly a dessert that brings smiles to every table.
Print
No-Bake Fruity Pebbles Cheesecake – A Fun and Easy Dessert
This no-bake cheesecake combines a fun and colorful Fruity Pebbles crust with a smooth, creamy cheesecake filling. It’s an easy, quick dessert perfect for parties, birthdays, or any occasion where you want a light and playful treat without heating up the kitchen.
- Total Time: 0 hours
- Yield: 10 1x
Ingredients
- 3 cups Fruity Pebbles cereal
- 6 tablespoons unsalted butter, melted
- 2 tablespoons granulated sugar
- 16 oz (450 g) cream cheese, softened
- 1 cup powdered sugar
- 1 teaspoon vanilla extract
- 1½ cups heavy whipping cream
- Optional: extra Fruity Pebbles for topping
Instructions
- Lightly crush the Fruity Pebbles cereal in a large bowl.
- Add melted butter and granulated sugar to the cereal and stir until coated.
- Press the mixture firmly into the bottom of a 9-inch springform pan or pie dish.
- Chill the crust in the refrigerator for 15 minutes.
- Beat softened cream cheese until smooth in a large bowl.
- Add powdered sugar and vanilla extract to the cream cheese and mix well.
- Whip the heavy cream in a separate bowl until stiff peaks form.
- Gently fold the whipped cream into the cream cheese mixture until fully combined.
- Pour the filling over the chilled crust and smooth the top evenly.
- Cover with plastic wrap and refrigerate for at least 4 hours, preferably overnight.
- Before serving, sprinkle additional Fruity Pebbles on top.
Notes
Use softened cream cheese for a lump-free filling.
Be careful not to overmix when folding whipped cream to keep the filling light and airy.
Press the crust firmly to avoid crumbling when serving.
Customize the topping with fresh fruit or a drizzle of honey if desired.
- Prep Time: 20
- Cook Time: None
FAQs
Q: Can I use a different cereal instead of Fruity Pebbles?
A: Absolutely! You can substitute Fruity Pebbles with any colorful or crunchy cereal you prefer, such as Cocoa Pebbles, Rice Krispies, or even crushed graham crackers. Just keep in mind that the flavor and texture will vary slightly.
Q: How long does this cheesecake need to chill?
A: For the best texture, refrigerate the cheesecake for at least 4 hours. However, chilling it overnight will give you the creamiest and most firm result.
Q: Can I make this cheesecake dairy-free or vegan?
A: Yes, by using dairy-free cream cheese and whipping cream alternatives, you can make this recipe suitable for dairy-free or vegan diets. The texture might differ slightly but should still be delicious.
Q: How should I store leftovers?
A: Cover the cheesecake tightly with plastic wrap or store it in an airtight container in the refrigerator. It will keep well for up to 3 days.
Q: Can I freeze this cheesecake?
A: Freezing is possible, but the texture may change slightly upon thawing. If you do freeze it, wrap it well and thaw in the refrigerator overnight before serving.
Q: Is this recipe suitable for children?
A: Yes, this no-bake cheesecake is safe and loved by children, thanks to its sweet flavor and colorful appearance.