
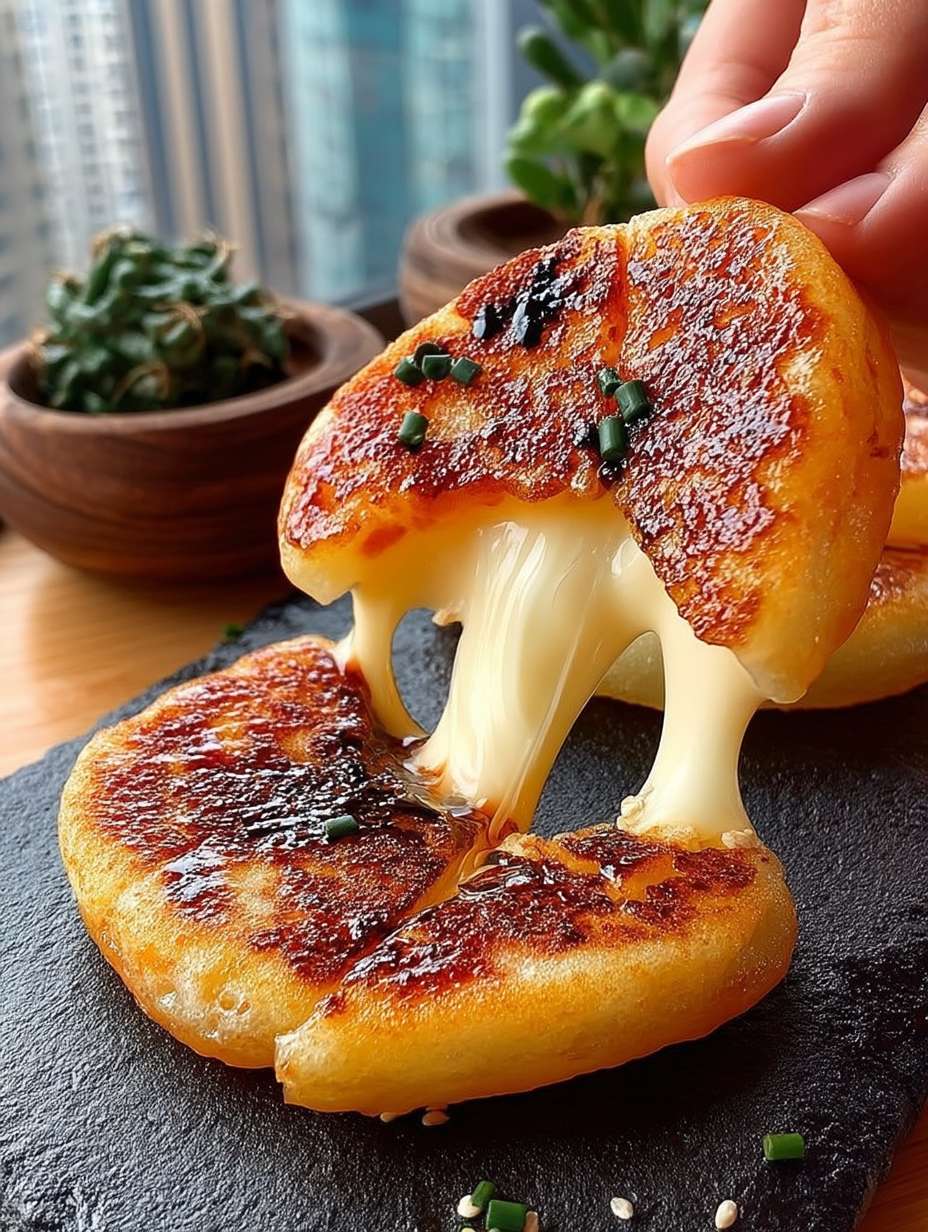
Imagine biting into a warm, fluffy Korean Cheese Hotteok, where gooey cheese meets a hint of sweetness and delightful crunch. The exterior is golden brown, perfectly crisp, while the inside bursts with molten cheesy goodness that dances on your palate.
This dish takes me back to my college days in a bustling city with food stalls lining the streets. I distinctly remember trying hotteok for the first time—one chilly evening, I bit into one and nearly melted into happiness. I had cheese dripping down my chin, but at that moment, I didn’t care because nothing could compete with that sweet, cheesy bliss!
You will love this recipe for several reasons! It’s incredibly easy to prepare, making it perfect for any home cook who wants impressive results without spending hours in the kitchen. The unique flavor profile combines sweet and savory notes with a satisfying texture that keeps you coming back for more. Its stunning appearance is sure to wow your family and friends when you serve them these delightful treats. Plus, you can customize the filling to suit your taste buds—whether you prefer extra cheese or want to mix in some fruits or nuts!
Ingredients for Korean Cheese Hotteok
Here’s what you need for this delicious dish:
Step-by-Step Preparation Korean Cheese Hotteok
Here’s a simple guide to help you prepare this delicious recipe:
Step 1: Prepare Your Dough
In a large mixing bowl, combine 2 cups of all-purpose flour, 2 tablespoons of sugar, 1 teaspoon of salt, and 1 tablespoon of instant yeast. Gradually add in 3/4 cup of warm water while stirring until everything comes together into a rough dough.
Step 2: Knead Until Smooth
Transfer the dough onto a lightly floured surface and knead it for about 5-7 minutes until smooth and elastic. You’re looking for a soft texture; if it’s too sticky, sprinkle a bit more flour.
Step 3: Let It Rise
Shape the kneaded dough into a ball and place it in an oiled bowl, turning it once to coat. Cover with a damp cloth and let it rise in a warm area until doubled in size—about 1 hour.
Step 4: Forming Hotteok
Once risen, punch down the dough (yes, take out that frustration!), then divide it into 8 equal pieces. Flatten each piece slightly in your palm and spoon about 1 tablespoon of shredded cheese mixed with cinnamon sugar into each round before carefully sealing them shut.
Step 5: Frying Time!
Heat about 2 tablespoons of oil in a non-stick skillet over medium heat. Carefully place each filled dough ball seam-side down in the pan. Cook them until golden brown on both sides—about 2-3 minutes per side—and press gently with a spatula to ensure even cooking.
Step 6: Serve Fresh
Remove from heat and allow them to cool slightly on paper towels before serving. Garnish with extra cinnamon sugar if desired! Enjoy immediately while they are still warm to savor that crispy crust filled with gooey cheese.
These Korean Cheese Hotteok are not just treats; they’re little pockets of joy! Perfect as an afternoon snack or dessert, they’ll surely bring smiles all around. So get ready to indulge—your taste buds will thank you!
Improving the Cooking Method
For perfect Korean Cheese Hotteok, start by letting the dough rest for at least 30 minutes. This helps develop gluten, ensuring a lovely chewy texture. Cook them on medium heat to achieve that golden-brown crust without burning the cheese inside.
Decorate Your Dish with Your Personal Touch

Feel free to swap out the cheese for a creamy goat cheese or even vegan cream cheese. You can also use blueberries instead of traditional fillings for a delightful twist that adds a burst of flavor.
Smart Tips for Storage and Reheating
To maintain the delightful texture of Korean Cheese Hotteok, store the cooked hotteok in an airtight container. For reheating, use a skillet to restore their crispy exterior while ensuring the cheese remains melty inside.
Practical Chef Advice
I still remember the first time I made Korean Cheese Hotteok for my friends; we laughed over sticky fingers and gooey cheese, creating memories as warm as the hotteok itself!
Conclusion for Korean Cheese Hotteok
Korean Cheese Hotteok offers a delightful fusion of flavors that will tantalize your taste buds. With its crispy exterior and gooey cheese filling, this recipe provides a unique twist on traditional hotteok. Not only is it simple to prepare, but it also serves as a perfect snack or dessert for any occasion. The combination of sweet and savory makes each bite an unforgettable experience. So why wait? Gather your ingredients and embark on this culinary adventure today! Your friends and family will be delighted by your delicious creation.
Print
Korean Cheese Hotteok
Delicious korean cheese hotteok recipe with detailed instructions and nutritional information.
- Total Time: 1 hour
- Yield: 4 servings 1x
Ingredients
- 2 cups all-purpose flour
- 3/4 cup warm water, around 110°F (43°C)
- 1 tablespoon instant yeast
- 2 tablespoons sugar
- 1 teaspoon salt
- 1 cup shredded cheese (Mozzarella or Cheddar)
- 2 tablespoons cooking oil (vegetable or canola)
- 1 tablespoon cinnamon
- 2 tablespoons sugar (for cinnamon sugar mixture)
Instructions
- In a large mixing bowl, combine 2 cups of all-purpose flour, 2 tablespoons of sugar, 1 teaspoon of salt, and 1 tablespoon of instant yeast.
- Gradually add in 3/4 cup of warm water while stirring until everything comes together into a rough dough.
- Transfer the dough onto a lightly floured surface and knead it for about 5-7 minutes until smooth and elastic.
- Shape the kneaded dough into a ball and place it in an oiled bowl, turning it once to coat.
- Cover with a damp cloth and let it rise in a warm area until doubled in size—about 1 hour.
- Once risen, punch down the dough and divide it into 8 equal pieces.
- Flatten each piece slightly in your palm and spoon about 1 tablespoon of shredded cheese mixed with cinnamon sugar into each round before carefully sealing them shut.
- Heat about 2 tablespoons of oil in a non-stick skillet over medium heat.
- Carefully place each filled dough ball seam-side down in the pan.
- Cook them until golden brown on both sides—about 2-3 minutes per side—and press gently with a spatula to ensure even cooking.
- Remove from heat and allow them to cool slightly on paper towels before serving.
- Garnish with extra cinnamon sugar if desired.
Notes
Store leftover hotteok in airtight containers, refrigerating to maintain freshness.
Reheat in a skillet for crispy goodness, avoiding soggy textures.
Serve with honey drizzle or fresh fruit for delightful contrast.
For extra cheese pull, use mozzarella or blend cheeses in the filling.
- Prep Time: 30 minutes
- Cook Time: 30 minutes
- Method: Stovetop
Nutrition
- Calories: 250 kcal
- Sugar: 8g
- Sodium: 200mg
- Fat: 10g
- Carbohydrates: 35g
- Fiber: 3g
- Protein: 5g
- Cholesterol: 25mg
FAQs
How can I store leftover Korean Cheese Hotteok?
To store leftover Korean Cheese Hotteok, let them cool completely before placing them in an airtight container. You can keep them in the refrigerator for up to three days. To reheat, simply pan-fry them on low heat until warmed through and the cheese is melty again. This way, you can enjoy their deliciousness even after the first serving!
Can I use different cheeses in Korean Cheese Hotteok?
Absolutely! While mozzarella is a popular choice for its melting qualities, feel free to experiment with other cheeses like cheddar or gouda. Just ensure that the cheese melts well to achieve that gooey texture you desire. The flavor will vary slightly with each cheese, adding a personal touch to your Korean Cheese Hotteok.
What type of flour should I use for this recipe?
For making Korean Cheese Hotteok, all-purpose flour works best due to its balanced protein content, which creates a soft yet chewy texture. If you’re looking for a gluten-free option, consider using a gluten-free flour blend designed for baking. Just remember to check that it can provide similar results in terms of texture and taste.
How do I know when my hotteok is cooked perfectly?
To ensure your Korean Cheese Hotteok is cooked perfectly, pay attention to the color and texture. They should be golden brown on the outside and feel slightly firm yet soft when gently pressed. If they are browning too quickly, lower the heat to allow the inside to cook thoroughly without burning the exterior. Enjoy!