
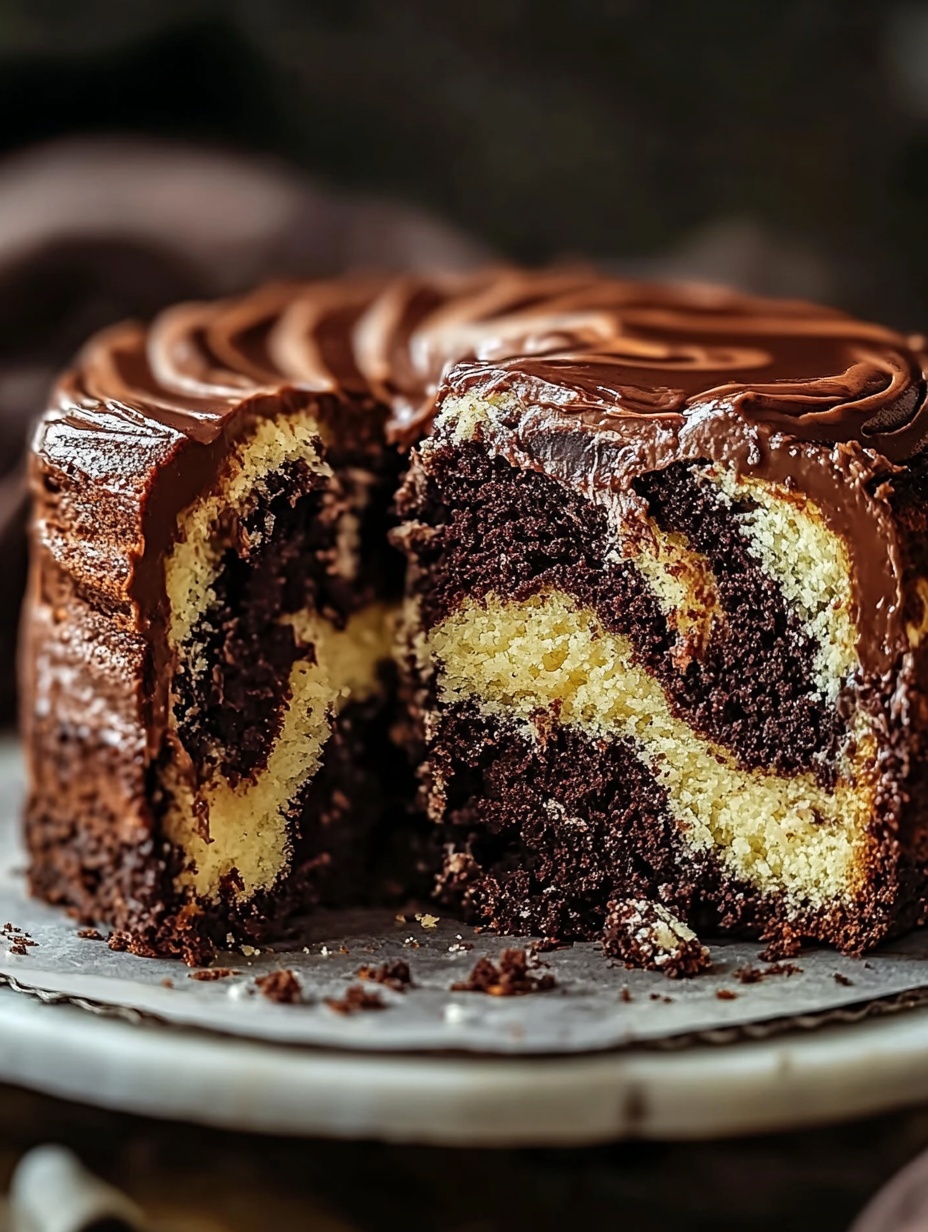
There’s something incredibly nostalgic about marble cake for me. Growing up, it was the dessert that made birthdays extra special, the one my mother would always make when we had guests coming over, and the cake that made our kitchen smell like heaven. Now, as a baker, I still find myself returning to this classic—refining it, testing it, and enjoying every swirl of vanilla and chocolate perfection. This marble cake is the best I’ve ever made, and I’m excited to share it with you.
You’re going to love this recipe because it’s not just a cake—it’s a celebration of flavor and texture. The beautiful marbled effect is visually striking, and the cake itself is light, moist, and rich all at once. The batter is silky smooth and bakes up into a tender crumb that practically melts in your mouth. Each bite carries that lovely balance of buttery vanilla and indulgent cocoa.
What makes this marble cake even better is its versatility. Serve it plain with a dusting of powdered sugar, drizzle it with a simple glaze, or top it with whipped cream or fresh fruit for special occasions. It works equally well as an afternoon snack, a lunchbox treat, or the centerpiece of a dessert table. You can bake it in a loaf pan, a bundt tin, or as a layer cake—it always turns out beautifully.
This recipe is also incredibly affordable. You won’t need any fancy or expensive ingredients—just pantry staples you probably already have. That’s what I love most about it. With simple ingredients and a straightforward method, you get a result that tastes like it came from a high-end bakery. Whether you’re baking for a family gathering or just treating yourself on a quiet afternoon, this cake delivers every time.
Ingredients for the recipe:
-
2 ½ cups all-purpose flour
-
2 ½ tsp baking powder
-
½ tsp salt
-
1 cup unsalted butter, softened
-
1 ¾ cups granulated sugar
-
4 large eggs
-
1 cup whole milk
-
1 tbsp vanilla extract
-
¼ cup unsweetened cocoa powder
-
2 tbsp milk (for cocoa mixture)
How to Prepare This Recipe
Step-by-Step Instructions for Preparation
Making this marble cake is a satisfying and straightforward process that anyone can master. It comes together quickly and bakes into a beautifully marbled dessert with minimal effort. Let’s walk through each step so you can recreate it confidently in your own kitchen.
Step 1: Preheat and Prepare
Begin by preheating your oven to 350°F (175°C). Grease and flour a 9×5 inch loaf pan (or a bundt pan or cake tin if preferred). Set it aside while you prepare the batter.
Step 2: Combine the Dry Ingredients
In a medium-sized bowl, whisk together the flour, baking powder, and salt. This ensures even distribution and helps create a soft, consistent texture.
Step 3: Cream the Butter and Sugar
In a large mixing bowl, beat the softened butter and granulated sugar together until light and fluffy. This usually takes about 3–5 minutes using a hand or stand mixer on medium speed. This creaming step is crucial—it builds air into the batter and gives the cake a tender crumb.
Step 4: Add the Eggs One at a Time
Add the eggs one at a time, mixing well after each addition. This keeps the batter smooth and prevents it from curdling. Once all the eggs are incorporated, add the vanilla extract and continue mixing until combined.
Step 5: Add the Dry Ingredients Alternately with Milk
Reduce the mixer speed to low. Add the dry ingredients in three additions, alternating with the milk in two additions. Begin and end with the flour mixture. Be careful not to overmix—just blend until everything is smooth and combined.
Step 6: Make the Chocolate Batter
Scoop out about ⅓ of the vanilla batter into a separate bowl. In another small bowl, mix the unsweetened cocoa powder with 2 tablespoons of milk to form a smooth paste. Stir this paste into the reserved batter to create your chocolate swirl mixture.
Step 7: Marble the Batter
Pour half of the vanilla batter into the prepared pan, spreading it evenly. Add spoonfuls of the chocolate batter on top, then layer with the remaining vanilla batter. Use a knife or skewer to gently swirl the batters together in a figure-eight motion. Don’t over-swirl—just a few swipes will create the classic marble look.
Step 8: Bake
Place the pan in the center of the preheated oven and bake for 55–65 minutes, or until a toothpick inserted in the center comes out clean. If the top is browning too quickly, loosely tent it with aluminum foil during the last 10–15 minutes of baking.
Step 9: Cool
Remove the cake from the oven and let it cool in the pan for 15 minutes. Then carefully transfer it to a wire rack to cool completely. The aroma will be tempting, but letting it cool helps lock in the moisture and flavor.
Quick and Easy
What I love about this recipe is how quickly it comes together. You don’t need any complicated tools or techniques. With a few mixing bowls and a hand mixer, you’re good to go. It’s ideal for both weekday baking and special weekend projects.
Customizable
Want to add a personal twist? Try incorporating a hint of espresso powder into the chocolate batter for a mocha flavor. Or sprinkle in some mini chocolate chips before baking. You could even drizzle a vanilla or chocolate glaze over the top once cooled for a beautiful finish.
Popular with Many People
This marble cake always disappears fast—whether I serve it at brunch, bring it to a potluck, or give it as a gift. Everyone loves the classic flavor combination and eye-catching swirl pattern. It’s elegant, yet comforting—a dessert that always wins hearts.
Print
The Best Marble Cake You’ll Ever Bake
This is the best marble cake you’ll ever bake—a perfect fusion of moist vanilla and rich chocolate swirled together for a striking, bakery-style presentation. Made from simple, budget-friendly ingredients, this cake is a go-to for every occasion. Whether served plain, glazed, or topped with fresh fruit, it’s a crowd-pleaser every time.
- Total Time: 1 hour 20 minutes
- Yield: 10 1x
Ingredients
- 2 ½ cups all-purpose flour
- 2 ½ teaspoons baking powder
- ½ teaspoon salt
- 1 cup unsalted butter, softened
- 1 ¾ cups granulated sugar
- 4 large eggs
- 1 cup whole milk
- 1 tablespoon vanilla extract
- ¼ cup unsweetened cocoa powder
- 2 tablespoons milk (for cocoa mixture)
Instructions
- Preheat oven to 350°F (175°C). Grease and flour a 9×5-inch loaf pan and set it aside.
- In a bowl, whisk together flour, baking powder, and salt. Set aside.
- In a large bowl, cream butter and sugar until light and fluffy, about 3–5 minutes.
- Add eggs, one at a time, mixing well after each addition. Stir in vanilla extract.
- On low speed, add the dry mixture in three parts, alternating with the milk in two parts, beginning and ending with the flour mixture. Mix just until smooth.
- In a separate small bowl, combine cocoa powder and 2 tablespoons of milk to make a paste.
- Transfer ⅓ of the vanilla batter to another bowl and mix in the cocoa paste to make the chocolate batter.
- Spoon half of the vanilla batter into the prepared pan. Drop spoonfuls of the chocolate batter over it, followed by the remaining vanilla batter.
- Use a knife or skewer to swirl the batters gently in a figure-eight motion for a marbled effect.
- Bake for 55–65 minutes, or until a toothpick inserted in the center comes out clean.
- Let the cake cool in the pan for 15 minutes, then transfer to a wire rack to cool completely before slicing and serving.
Notes
Do not overmix once the flour is added to keep the cake tender.
Avoid over-swirling the batters or the marbling effect will be lost.
This recipe is perfect with a simple glaze or served plain.
- Prep Time: 20
- Cook Time: 60
FAQs
Can I use oil instead of butter in this marble cake?
Butter gives the cake a rich flavor and a soft, tender crumb, but if needed, you can substitute it with 1 cup of neutral vegetable oil. Just note that the flavor and texture will be slightly different—oil makes it a bit moister but less buttery.
How do I get a perfect marble swirl?
To achieve the classic marbled effect, layer the batters alternately, then gently swirl with a knife or skewer. Don’t overdo it—just a few figure-eight motions are enough. Overmixing can blend the batters too much, losing the marble design.
Can I make this cake ahead of time?
Absolutely! This cake stays moist for several days. You can bake it a day or two in advance, wrap it tightly in plastic wrap or store it in an airtight container at room temperature. It also freezes well—just wrap it tightly and thaw it at room temperature when needed.
Can I turn this recipe into cupcakes or a layer cake?
Yes, the batter works beautifully for both. For cupcakes, fill liners 2/3 full and bake for 18–22 minutes. For a layer cake, divide the batter between two 8-inch round pans and bake for 30–35 minutes. Always test doneness with a toothpick.
What kind of cocoa powder should I use?
Use unsweetened natural cocoa powder for the chocolate portion. Dutch-processed cocoa can work too but may result in a slightly deeper color and richer flavor. Avoid sweetened cocoa mixes, as they alter the balance of sugar in the recipe.
Is this recipe suitable for kids?
Yes, this is a family-friendly cake with no strong or artificial flavors. The balance of chocolate and vanilla appeals to kids and adults alike, and it’s soft enough for young children to enjoy.
How should I store leftover marble cake?
Store leftovers in an airtight container at room temperature for up to 3 days. For longer storage, refrigerate it for up to 5 days or freeze slices individually for future treats.